Rivas Lifestyle & Co.
The Rivas Budget Guide
Everything the budget app can do, in the order you'll probably use it. Written for Jose and Jeanette, current as of version 5.9.
Jump to a section
Every screenshot in this guide uses made-up sample data, so none of your real finances appear here. Your own numbers will look different. The gold numbered dots on the screenshots match the numbered lists beneath them.
01
Getting started
The budget app lives at rivas-lifestyle.pages.dev/budget. You'll mostly use it on a computer, and it has a matching phone version. Both show the same data in real time, so an entry Jeanette adds on her phone appears on Jose's computer right away.
It's always one tap away. On the Rivas home page, the one with the Business Tracker and Budget Tracker cards, look for Budget guide just under the Sign out button. You can also go straight to rivas-lifestyle.pages.dev/guide. You need to be signed in to open it.
Put it on your iPhone
- Open the link above in Safari and sign in if it asks.
- Tap the Share button, then Add to Home Screen.
- From then on, open it from the new icon. It runs full screen like a regular app.
Finding your way around
| Area | What it's for |
|---|---|
| Home | The big picture: how much you have left to spend, what's coming up, and your accounts. |
| Plan | Your monthly budgets by category (envelopes), with budget, actual and what's remaining. |
| Reports | Charts and totals for spending, cash flow and income. |
| Recurring | Bills and paychecks that repeat, as a list or a calendar. |
| Ledger | Every single entry. Search, fix, split or delete. |
| Goals | Savings goals and debts, including promo-rate countdowns. |
| Settings | Envelopes, accounts, categories, imports, backups and Reconcile. |
On a computer these are in the dark sidebar. On the phone you get four tabs along the bottom: Home, Ledger, Goals and More. More holds Reports, Recurring and Settings. At the very top of every phone screen there is a ← Home button. It takes you back to the Rivas home page, and it sits in the same place in the Budget Tracker, the Business Tracker and the Habits Tracker. On a computer, use ← All apps at the top of the sidebar instead.
Two buttons float on every screen: + adds an entry, and the gold ✦ opens the Budget Assistant (see section 12).
The month selector
Home, Plan and Reports share one month. Use the ‹ › buttons on any of them and the others follow. The Ledger has its own month picker so you can browse old entries without moving the rest of the app.
Suggested first-week setup
- Add your bank accounts in Settings → Accounts. Details
- Import a bank statement to fill in your history. Details
- Reconcile so the app matches your real balances. Details
- Create envelopes for the categories you want a monthly budget on. Details
- Add recurring bills like rent and subscriptions. Details
- Add your debts and goals, including any 0% promo end dates. Details
Making sure you have the latest version
The version number is at the bottom of Settings, like Budget Tracker · v5.9. After an update, refresh once with ⌘ Shift R in Safari on a computer. On the phone, swipe the app away and open it again.
02
Home
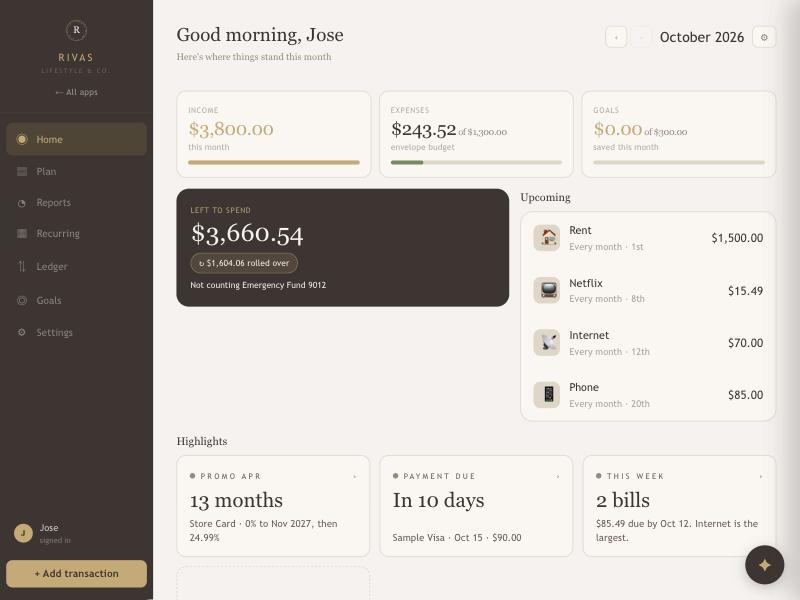
Home answers one question: how are we doing right now?
 1
2
3
4
5
6
1
2
3
4
5
6
- Month buttons. Step back to see an earlier month.
- ⚙ Customize. Choose what shows on Home (see below).
- Income, Expenses and Goals. Income is what came in this month. Expenses is how much of your total envelope budget you've used. Goals shows how much you've saved toward this month's savings targets.
- Left to spend. The number that matters most. The small chip shows money rolled over from earlier months. If an account is hidden, a note says so.
- Upcoming. Your recurring bills and paychecks.
- Highlights. Quiet message tiles for things coming up. Click any tile to open the screen it's about (explained next).
Highlights
Highlights are small tiles for anything you don't want to forget. Some update themselves and some you write.
| Tile | What it shows |
|---|---|
| Promo APR | How long until a card's 0% rate ends, and the rate that follows. One tile per card. |
| Payment due | The next debt payment, with its date and the amount due this month (or your monthly payment if you haven't entered one). |
| This week | The bills due in the next 7 days and their total. |
| Countdown | Your own: a title and a date, such as "Anniversary trip, 60 days". An amount is optional. |
| Note | Your own short message, such as "Call the card company about a credit limit". |
Tiles stay calm until something is close. A small dot and the number's color then tell you how urgent it is:
Quiet. Nothing to do yet. Soon. A payment within 7 days, or a promo ending within 6 months. Now. A payment within 2 days, or a promo ending within 3 months.
The most urgent tiles always come first. On a computer you see three at a time, with a dashed + more tile for the rest. On the phone they appear as one list.
Click a tile to see more
Every highlight is a button. Each one has a small › in its corner, and the border turns gold when you point at it. Clicking takes you to where the details live:
| Tile | Where it takes you |
|---|---|
| Promo APR | Goals, scrolled to that card, which flashes gold for a moment so you can spot it. From there you can tap Edit to change the promo date or rate. |
| Payment due | Goals, with the card the payment belongs to highlighted. |
| This week | The Recurring calendar, so you can see which bills land on which days. |
| Countdown or Note | The Customize panel, scrolled to that tile and highlighted, so you can reorder, hide, or remove it. |
On the phone, tap a row in the list. A debt tile opens Goals on the Pay down tab. You can also use the keyboard: press Tab to move between tiles and Enter to open one.
 1
2
3
4
1
2
3
4
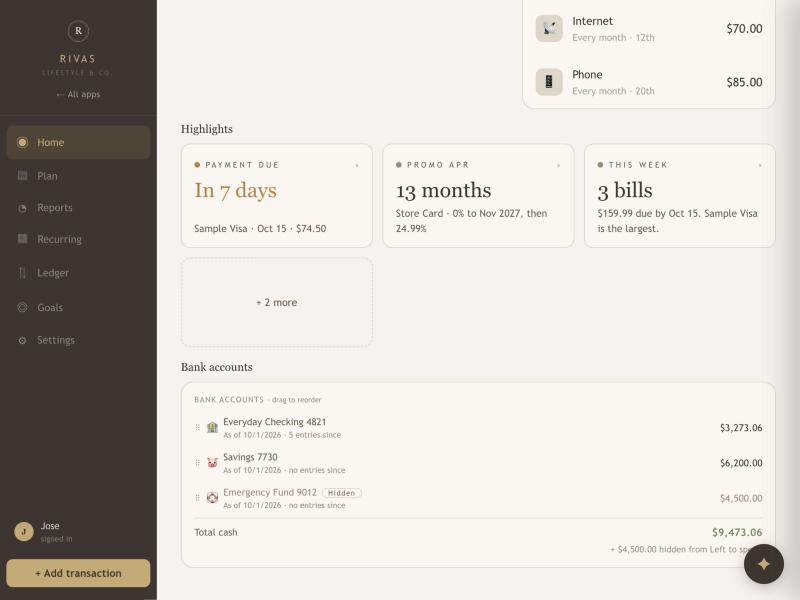
- Highlight tiles, most urgent first.
- + 2 more. Click to show every tile, and again to collapse them.
- Bank accounts. Drag the dotted handle to reorder. The total shows your counted cash.
- Hidden tag. This account is left out of Left to spend. See section 7.
Customize what's on Home
 1
2
3
4
1
2
3
4
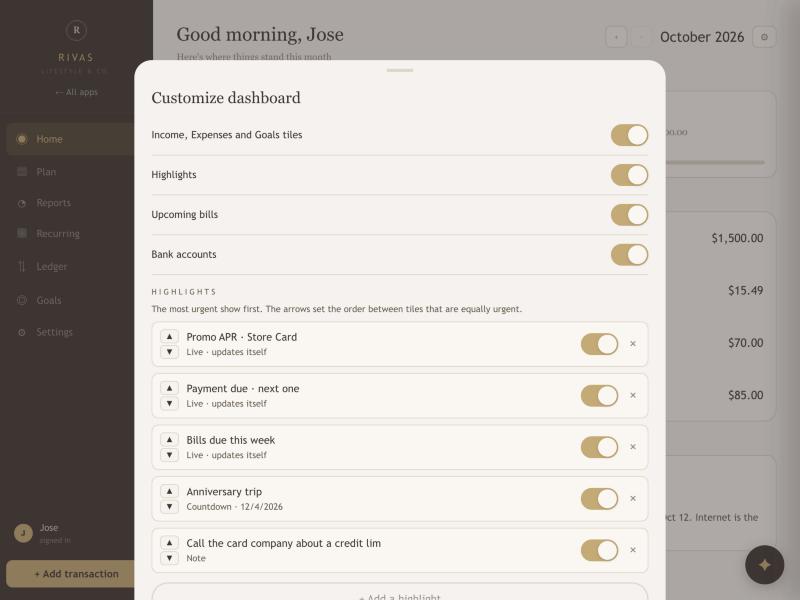
- Section switches. Turn whole blocks of Home on or off.
- ▲ ▼ arrows. Set the order. Urgent tiles still come first, so the arrows decide the order among tiles that are equally urgent.
- Switch. Hide a tile without deleting it.
- × Remove a tile for good.
Add your own highlight
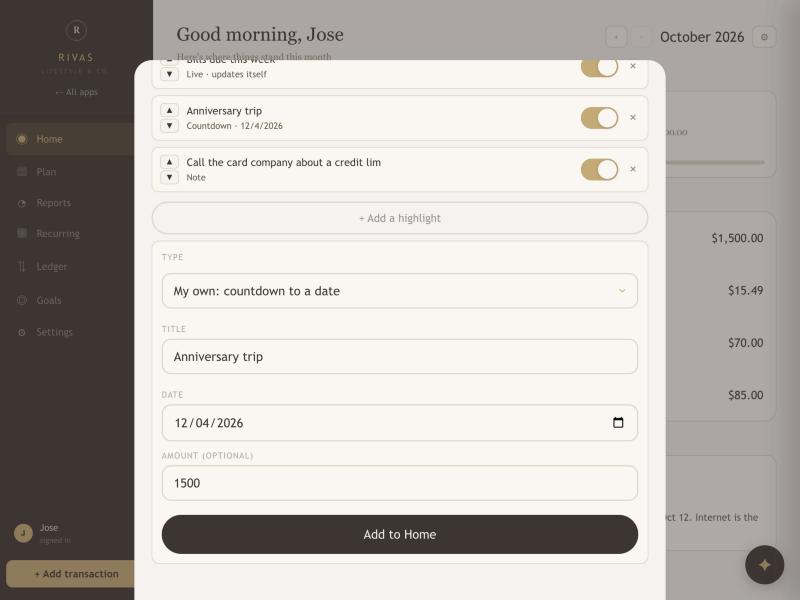
- Open ⚙ and scroll to the bottom.
- Tap + Add a highlight.
- Pick a type. The live types ask which card. The countdown asks for a title and a date. The note asks for your message.
- Tap Add to Home.
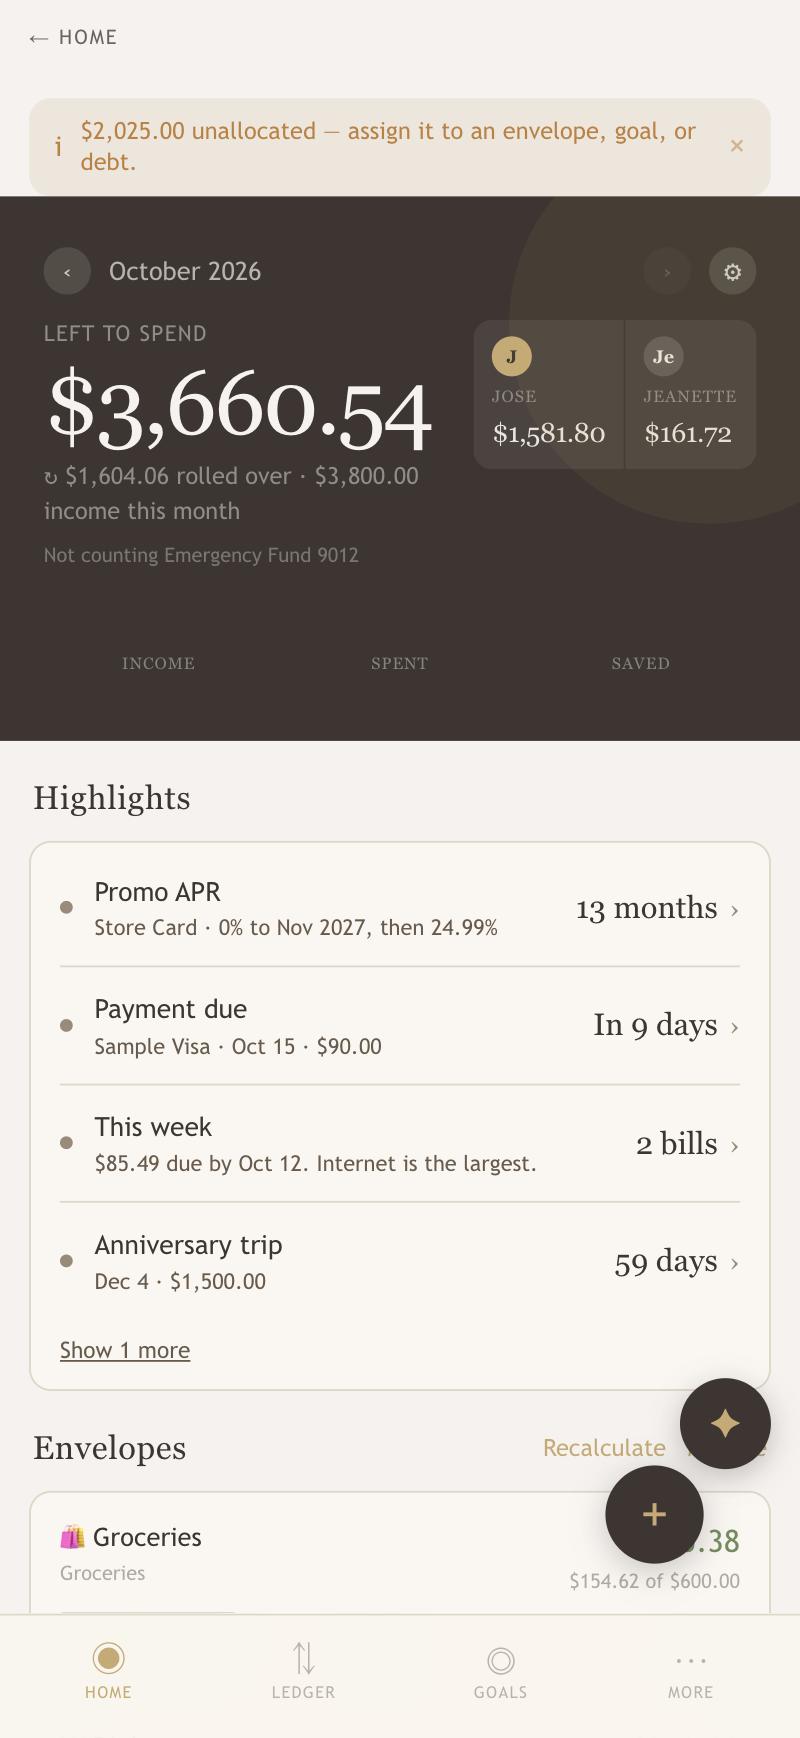
Home on your phone
 1
2
3
4
5
1
2
3
4
5
- Left to spend sits in the dark card at the top.
- Who spent it. Jose's and Jeanette's spending this month.
- Highlights as one calm list. Tap a row to open the screen it's about.
- Show more reveals the rest.
- Tabs. Home, Ledger, Goals and More.
Scroll down for your envelopes, a month summary, your bank accounts and recent entries.
03
Add an entry
Use this for anything you want to record by hand: cash, a purchase you want in right away, a paycheck, or a payback from a friend.
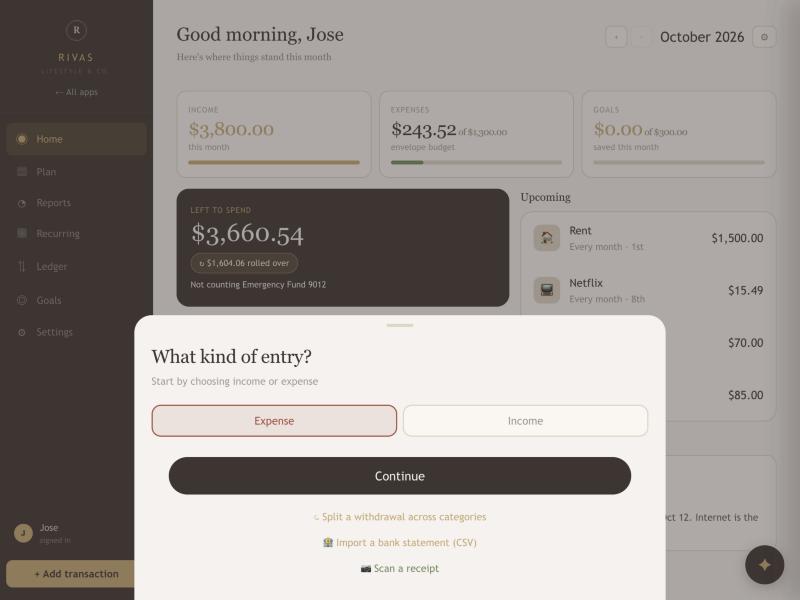
- Click + Add transaction in the sidebar, or the round + button on the phone.
- Choose Expense or Income, then tap Continue.
- Type the amount.
- Pick the category.
- Give it a name such as the store.
- Check the date. It starts as today.
- Choose the account it came from. This is optional, but it keeps your accounts accurate. The app remembers your last choice.
- Add a note if you like, then tap Save entry. Skip saves without a note.
 1
2
3
4
5
1
2
3
4
5
- Expense or Income.
- Continue.
- Split a withdrawal. For one amount that covers several categories (see section 4).
- Import a bank statement. See section 5.
- Scan a receipt. See below.
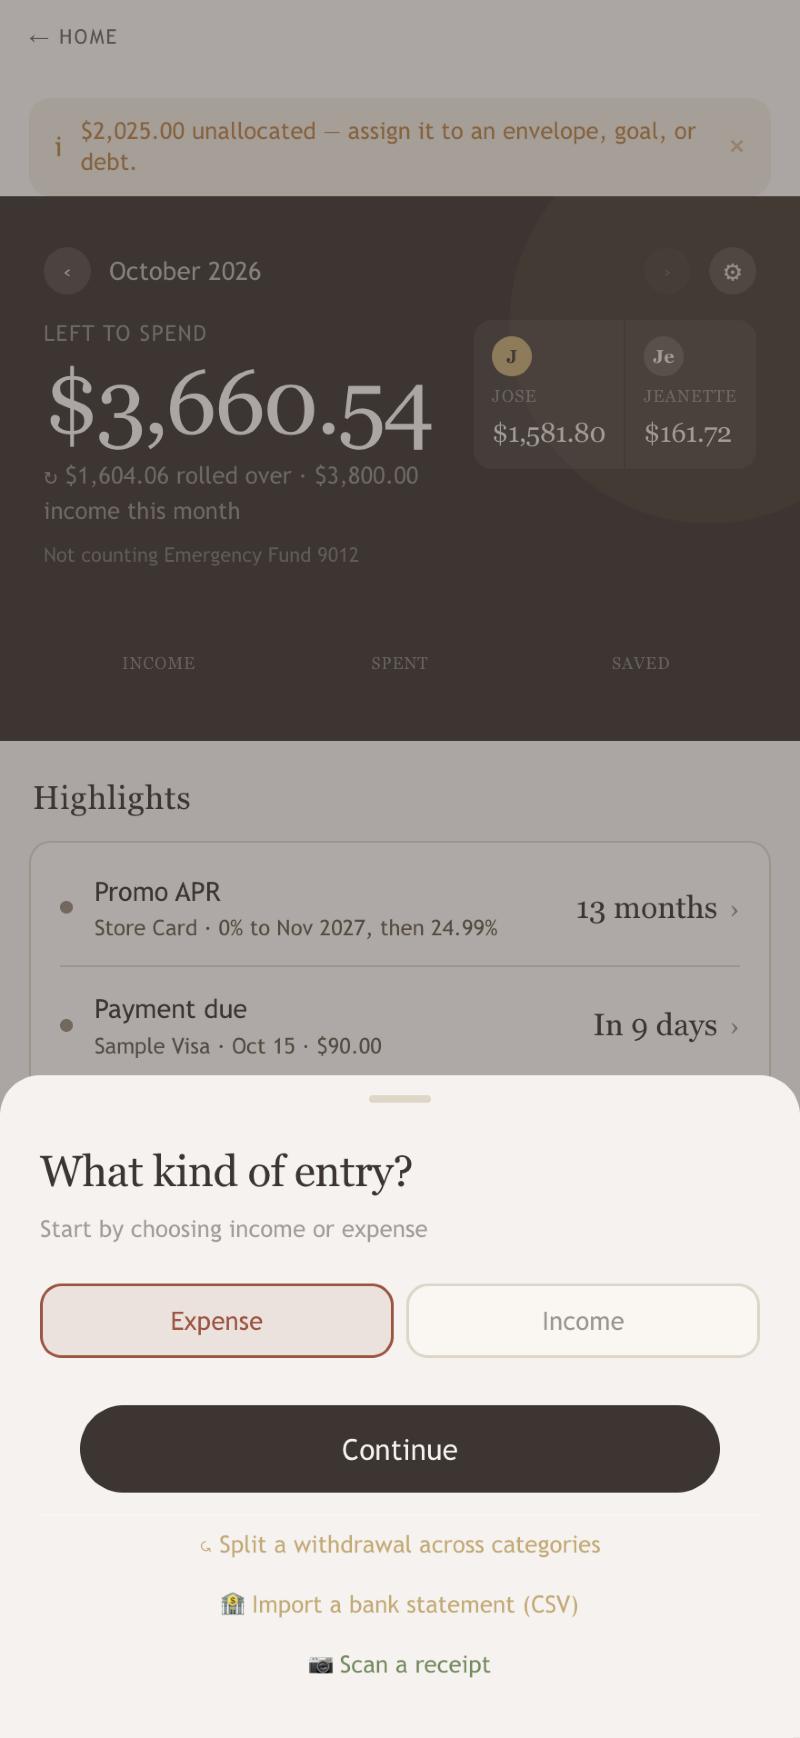
Choosing a category
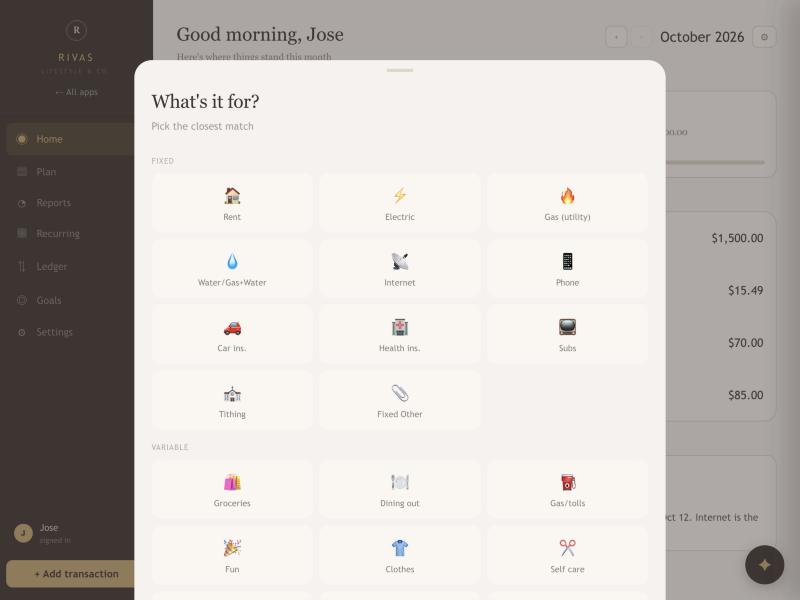
Debt and savings goals appear as tiles too. Picking Pay: Store Card lowers that card's balance by the amount. Picking Save: Vacation Fund adds it to that goal.
Need a category that isn't there?
Scroll to the bottom of the category list and tap + New category. Name it, choose a group (Fixed, Variable or Amway) and an icon. You land right back in your entry with the new category already selected.
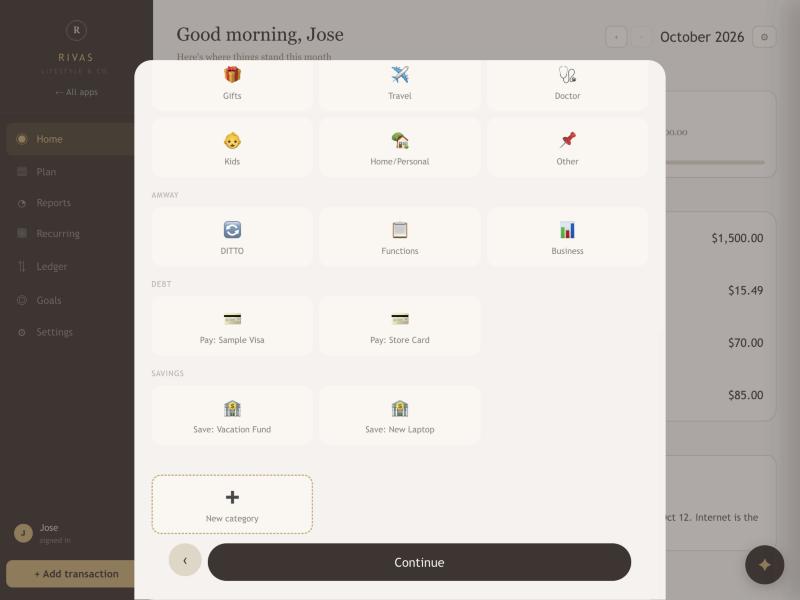 1
1
- + New category. Only on expenses. Income categories are fixed.
The account step
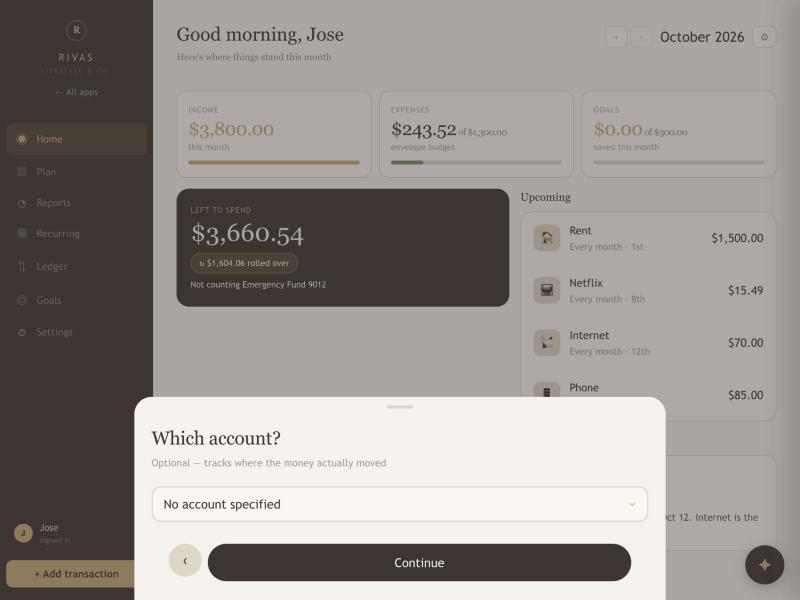
The account you choose moves with the entry: an expense lowers that account's balance and income raises it. See Accounts and Reconcile.
Scan a receipt
Tap Scan a receipt and take or choose a photo. The app reads the amount, store name and date and fills in the first steps for you.
- Nothing is uploaded. The reading happens on your device, and the photo is never saved. Only the numbers and words it finds are kept.
- Always check it. A gold badge, Filled from receipt, check before continuing, reminds you. Reading receipts isn't perfect, so fix the total, store or date if they look off.
- Later, when you import your bank statement, the app notices when a charge matches a receipt entry and asks you before adding it twice (see section 5).
04
Ledger
The Ledger lists every entry, newest first, grouped by day. It's where you go to find something, fix a mistake, or see exactly what's behind a number.
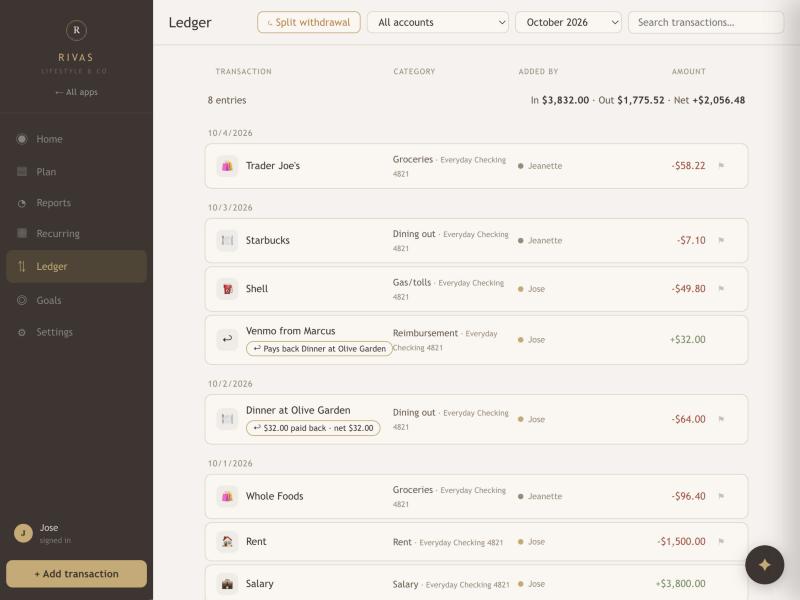 1
2
3
4
5
6
1
2
3
4
5
6
- Split withdrawal. Divide one amount across categories.
- Account filter. Show one account, or No account specified to find entries that still need linking.
- Month. Its own picker, separate from Home.
- Search. Matches names, notes and categories.
- Totals. Count, money in, money out and net for exactly what's showing, with a Clear filter link when an account is chosen.
- Linked entries. A gold chip shows a reimbursement and the expense it pays back. Tap it to jump to the other one.
Edit or delete an entry
- Click any row.
- Change the amount, category, name, date, account or note.
- Tap Save changes, or Delete transaction to remove it.
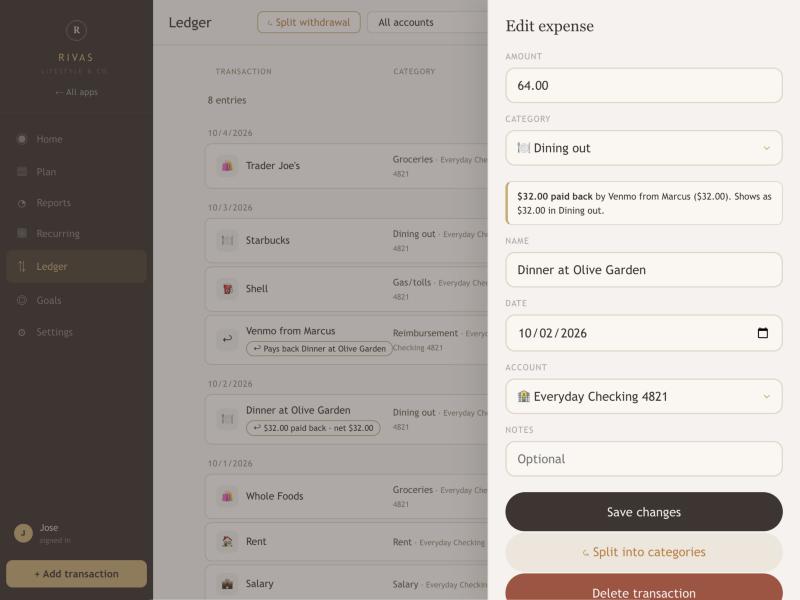 1
2
3
4
1
2
3
4
- Category. Fixing a category here teaches the app that merchant for future imports.
- Paid back. Shows reimbursements linked to this expense and the net amount (see section 8).
- Account.
- Split into categories.
Split one amount across categories
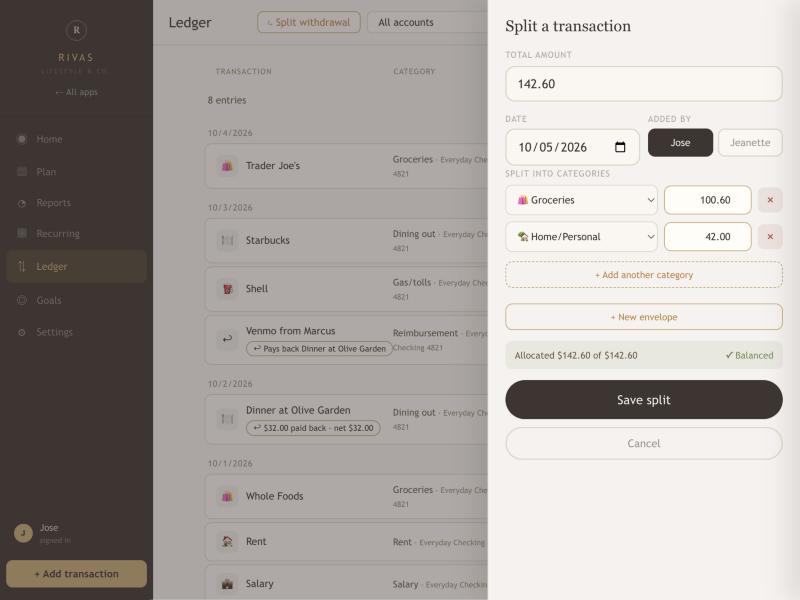
A Costco run that was part groceries and part household is a good example. Use the Split withdrawal button in the Ledger, the Split into categories button when editing an expense, or the Split button on a row while importing a statement.
 1
2
3
4
5
6
1
2
3
4
5
6
- Category. Your envelopes are listed first, then every other category.
- Amount for that category.
- + Add another category adds a row.
- + New envelope lets you create an envelope without leaving this panel. You come straight back with it selected.
- Balanced. Turns green when the pieces add up to the total.
- Save split stays gray until the total is balanced.
Flag something for your partner
Next to an expense is a small ⚑. Tap it, add a note, and the other person sees a banner on their Home screen the next time they open the app. They tap Got it to dismiss it.
The Ledger on your phone
 1
2
3
4
1
2
3
4
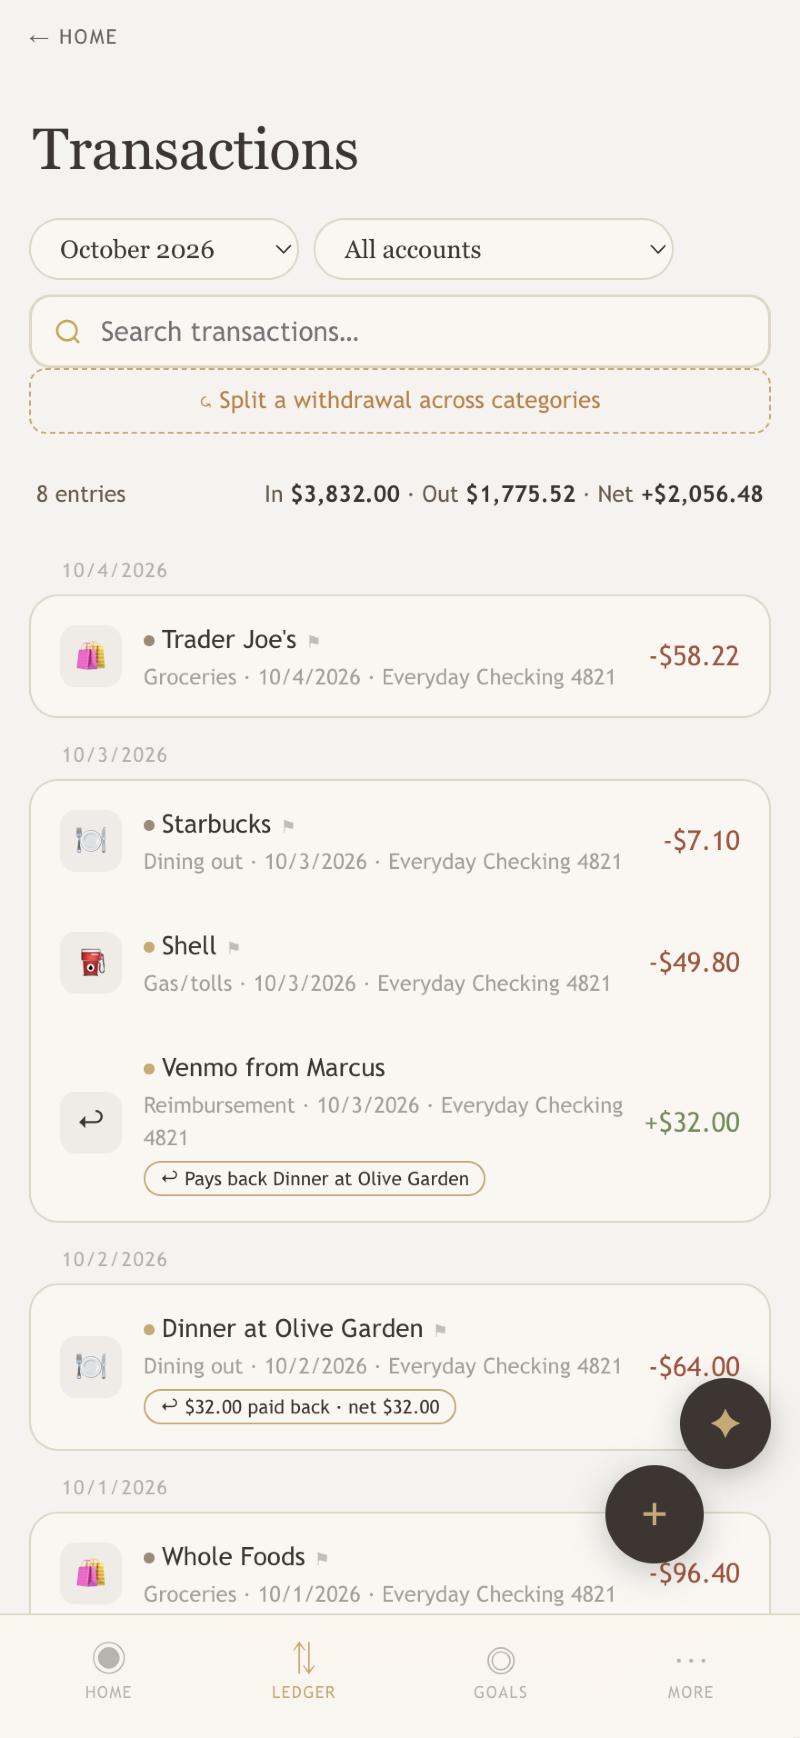
- Month picker.
- Account filter.
- Totals for what's showing.
- Reimbursement chip. Tap to jump to the linked entry.
05
Bank statements and receipts
Importing a statement is the fastest way to fill the app with real history. It works with Chase, Apple Card, Bank of America, Wells Fargo, Citi and most other banks' CSV files.
Download a statement from your bank
In your bank's website, look for Download or Export next to your transactions and choose CSV. A file lands in your Downloads folder.
Import it
- Open Add transaction → Import a bank statement, or Settings → Data → Import bank statement.
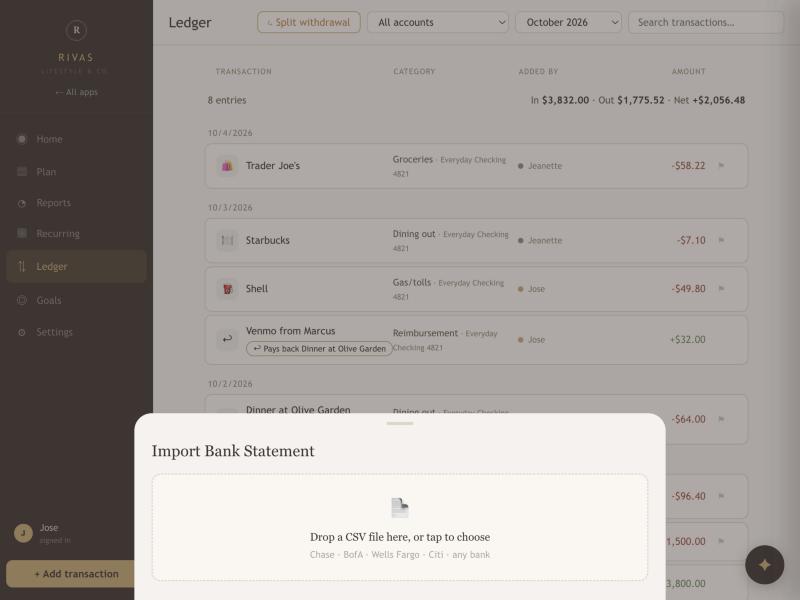
- Drop the file onto the box, or click it and choose the file.
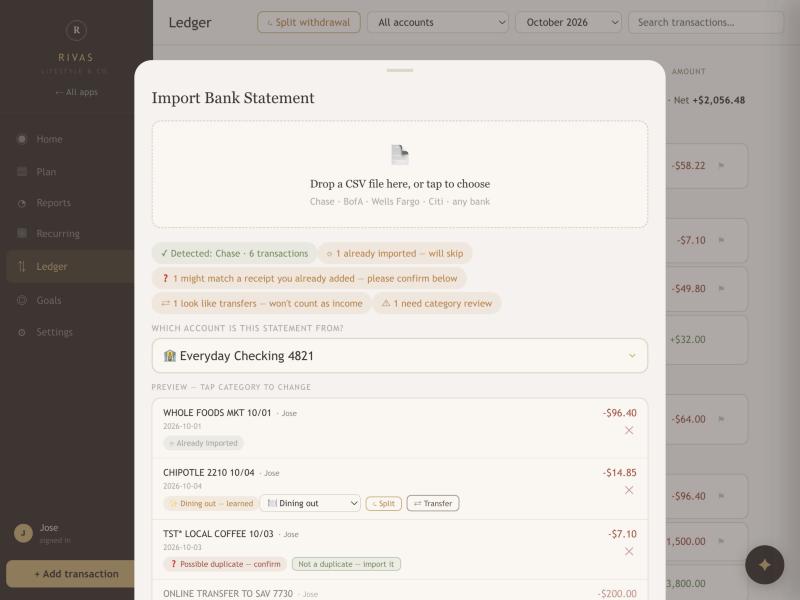
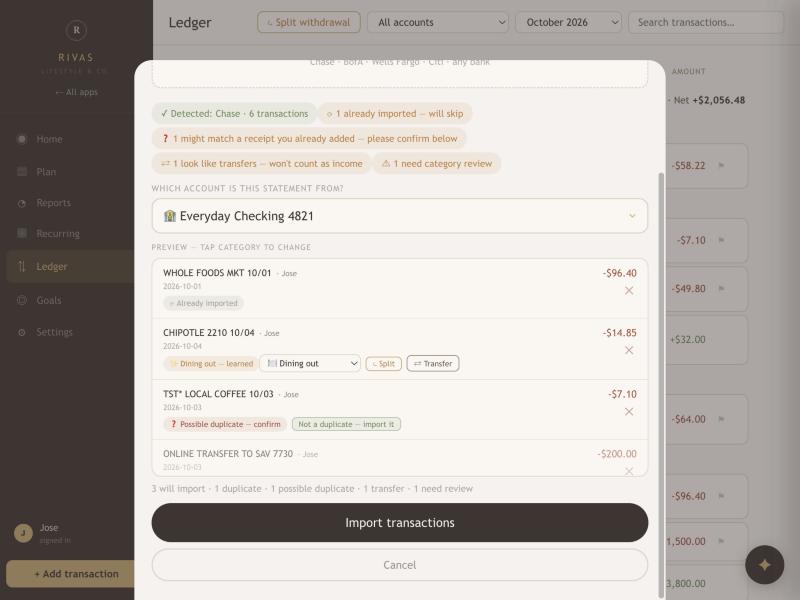
- Check which account the statement is from. The app guesses from the bank name.
- Look over the preview and fix anything you disagree with (see below).
- Tap Import transactions.
 1
2
3
4
5
1
2
3
4
5
- Summary chips. How many will import, how many are duplicates, and how many need a look.
- Which account. Every imported entry is linked to this account.
- Already imported. Skipped automatically so nothing is counted twice.
- Category. Click the dropdown to change it. The app learns your choice for next time. Split divides the row, and Transfer marks it as money moving between your own accounts.
- Possible duplicate. Explained next.
What the labels mean
| Label | What it means | What to do |
|---|---|---|
| Already imported | Same store, amount and date as something you already have. | Nothing. It's skipped. |
| Possible duplicate | The amount and date match an entry you added by hand or from a receipt, but the store name is worded differently. | Tap Not a duplicate, import it if it's a separate charge. Leave it to skip it. |
| Looks like a transfer | Moving money between your own accounts. It won't be counted as income. | Use the Transfer button on a row if the app missed one. |
| Needs category review | The app doesn't recognize this store yet. | Pick a category. It remembers next time. |
This is how receipts and statements work together. You can scan a receipt today and import the statement next week without doubling anything up. When something is unclear, the app asks you.
Fix a bad import
- Settings → Data → Undo a bank import removes every entry added by a particular import. Use it if you picked the wrong account or file.
- Settings → Data → Clean up transfers finds transfers and reimbursements that were counted as income. Tick the ones to remove.
Import first, then add anything missing by hand. Learned merchants (Settings → Learned merchants) show everything the app has remembered, and a Forget button if it learned something wrong.
06
Plan and envelopes
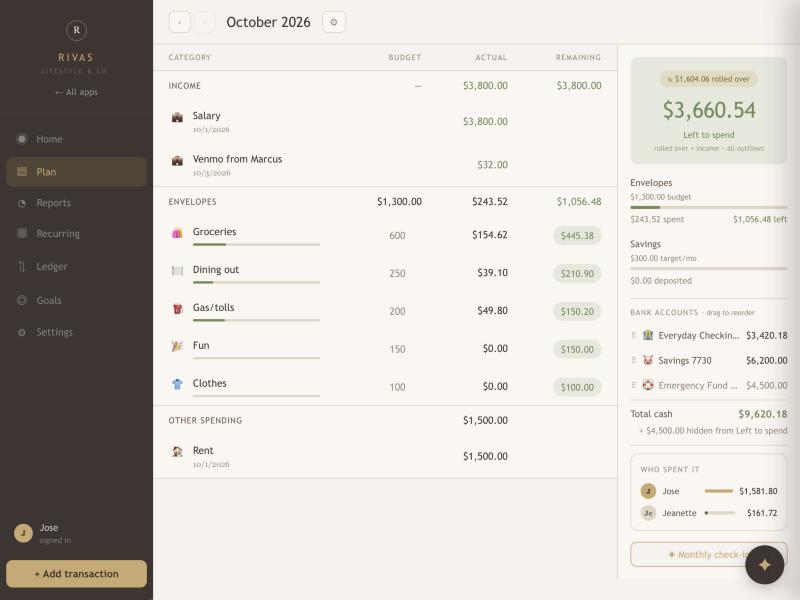
An envelope is a category with a monthly budget, like Groceries at $600. The Plan page shows how each one is doing.
 1
2
3
4
5
6
1
2
3
4
5
6
- Month buttons. Shared with Home and Reports.
- ⚙ Recalculate budgets. See below.
- Budget, Actual, Remaining. What you planned, what you've spent, and what's left.
- Remaining pill. Turns red if you go over.
- Left to spend and envelope totals for the month.
- Who spent it, plus a Monthly check-in ✦ button that writes a plain-English recap of the month.
Create an envelope
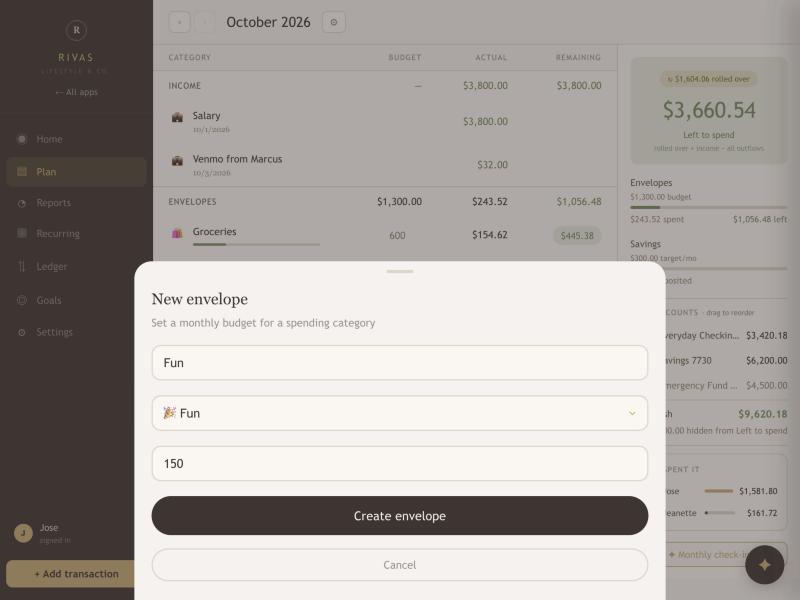
- Go to Settings → Envelopes and tap Add envelope. (You can also do this from the Split panel.)
- Pick the category. The name fills in for you.
- Enter the monthly budget.
- Tap Create envelope.
To change a budget later, go to Settings → Envelopes and type a new number in the amount box beside the envelope.
Recalculate budgets
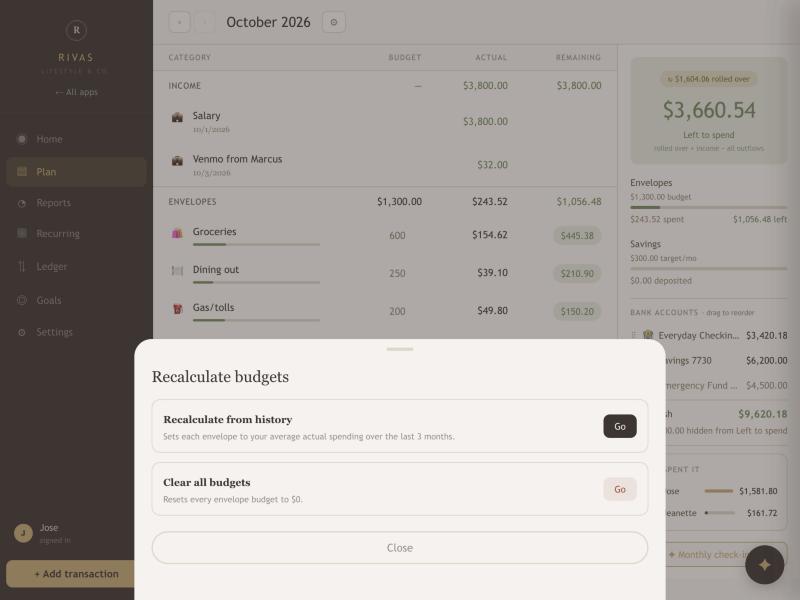
Tap ⚙ at the top of the Plan page. Recalculate from history sets every envelope to your average spending over the last 3 months, a quick way to start with realistic numbers. Clear all budgets resets every envelope to $0.
07
Accounts and Reconcile
Add your accounts
- Go to Settings → Accounts and tap Add a bank account.
- Enter a name (including the last four digits helps), choose Checking, Savings or Other, and type today's balance.
- Tap Save account.
Link each entry to the account it belongs to whenever you add one, edit one, or import a statement. That's what lets you filter the Ledger and Reports by account, and lets Reconcile check each account on its own.
Balances update as you add entries
An account's balance moves on its own. Link an expense to Checking and Checking goes down. Link a paycheck to it and it goes up. The balance you see is the same one Reconcile has always worked out:
It appears on the Home accounts card (see section 2), in Total cash, in Goals → Accounts, in Settings → Accounts and in the assistant's answers. Under each account name you'll see when the starting balance was set and how many entries have counted since.
- Nothing is stored twice. Edit or delete an entry, or undo a bank import, and the balance corrects itself.
- Entries dated on or before the check day don't count. Your bank's balance already includes them. An entry you add on the check day itself, after you checked, does count.
- Entries with no account don't move any balance. That's one more reason to link every entry.
- Your bank is still the boss. If the app's balance and your bank disagree, use Reconcile. The real balance you type becomes the new starting point.
- Left to spend doesn't change because of this. It already counted every entry.
New accounts start counting the day you add them. An account you've never reconciled shows Not tracking yet and keeps the balance you typed until you reconcile it or save it once under Settings → Accounts.
Hide an account from Left to spend
Some money isn't for day-to-day spending, like an emergency fund or a business account. Hide it so it doesn't inflate your budget.
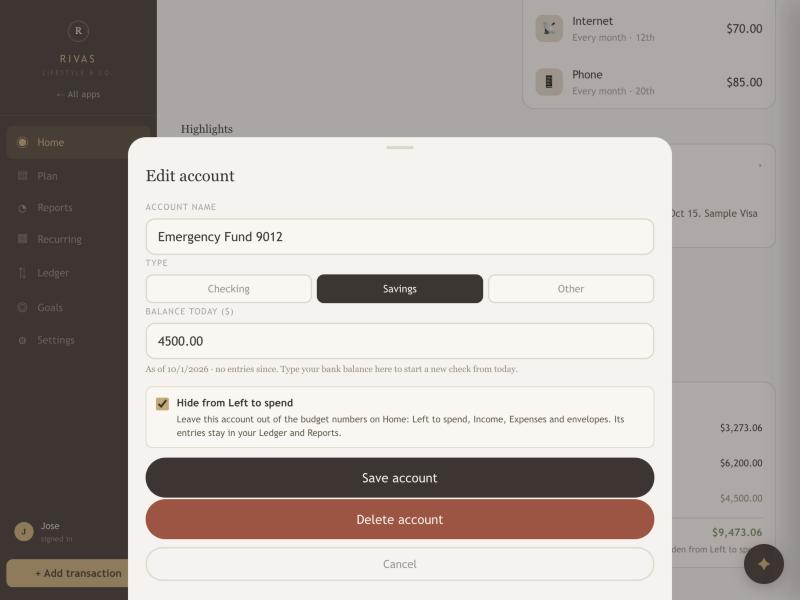
- Open Settings → Accounts and tap the account.
- Switch on Hide from Left to spend.
- Tap Save account. The app shows what will change and asks you to confirm.
 1
2
1
2
- Balance today. This shows the live balance. Leave it alone and nothing changes. Type your bank's balance instead and that becomes a fresh starting point from today.
- Hide from Left to spend.
A hidden account is left out of Left to spend, the Income and Expenses tiles, and envelope progress. Its balance is no longer counted as spendable money. Its entries stay in the Ledger and Reports. Home shows a note such as Not counting Emergency Fund 9012, and the accounts card shows a Hidden tag and a line like + $4,500.00 hidden from Left to spend. Turn the switch off any time to bring it back.
Reconcile
Reconciling means checking the app against your real bank balances. It takes a couple of minutes and is worth doing about once a month.
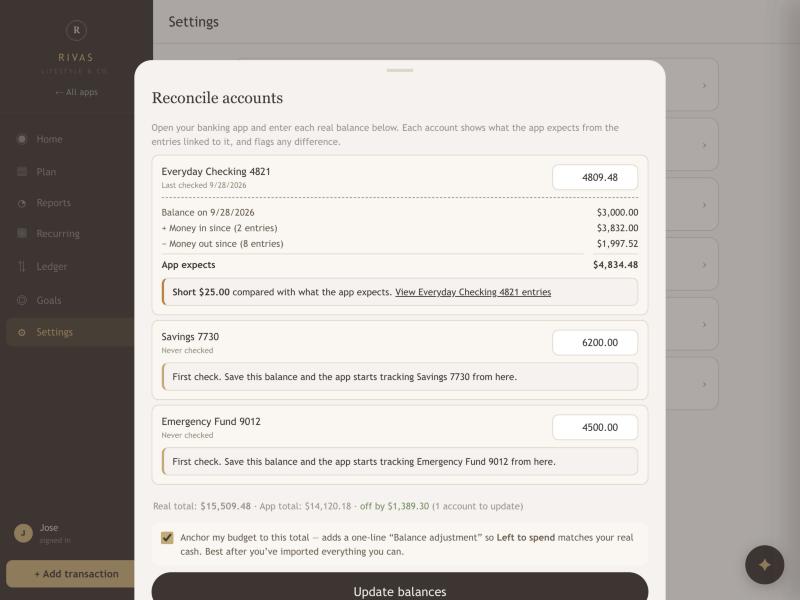
- Open your banking app and note each account's current balance.
- In the app, go to Settings → Data → Reconcile accounts.
- Type the real balance into each account's box. It starts with the app's live balance, so if your bank agrees there's nothing to type.
- Read the message under each account (see below).
- Tap Update balances.
 1
2
3
4
5
6
1
2
3
4
5
6
- Real balance. Type what your bank shows.
- What the app expects. Your balance at the last check, plus money in and out since then, from entries linked to this account.
- Short or Over. The gap between your real balance and the expected one. ✓ Matches means you're in sync.
- View entries. Opens the Ledger filtered to this account so you can find the missing or wrong entry. If entries have no account, the message says how many and offers to show them.
- First check. The first time, there's nothing to compare. Saving sets the starting point for next time.
- Anchor my budget. See below.
With the box ticked, the app adds one entry called Balance adjustment so that Left to spend matches your real cash. It's replaced each time you reconcile. It's best to import everything you can first, then reconcile. Untick the box if you'd rather chase down the missing entries before changing Left to spend.
08
Reimbursements
A friend pays you back for part of a meal. You don't want that money counted as income, and you don't want the meal to look like it cost you the full amount. Here's how to record it.
- Record the full $64 meal as an expense, as it appears on your card.
- When your friend sends $32, tap + Add transaction → Income.
- Choose the Reimbursement category (the ↩ tile) and enter the amount.
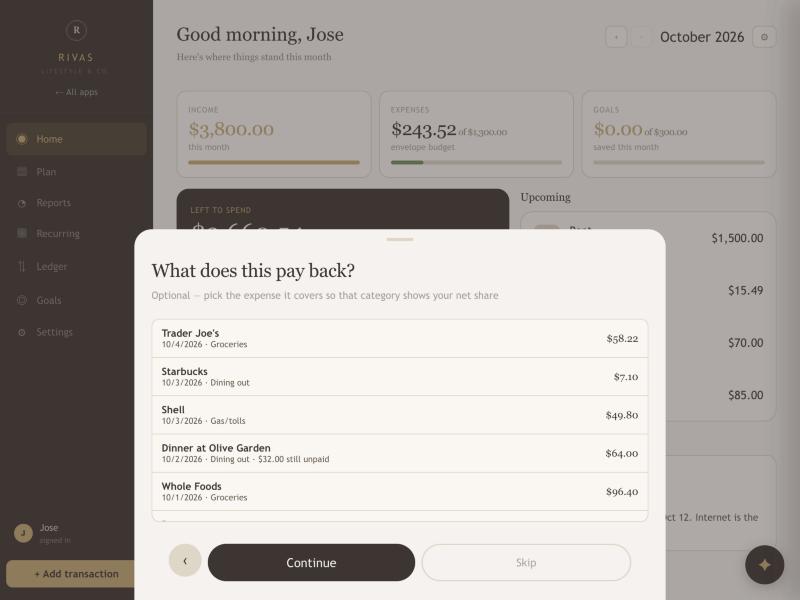
- On the What does this pay back? step, tap the meal. A note shows what will change.
- Save it.
 1
2
1
2
- Pick the expense. Recent expenses are listed. The one with money already paid back shows how much is still unpaid.
- Skip. Saves it as a plain reimbursement with no link.
What changes
- Dining out shows $32, your share, instead of $64.
- The Ledger shows both entries, joined by a gold chip: $32.00 paid back, net $32.00 on the meal, and Pays back Dinner on the payback.
- Reports don't count it as income. The Income report lists it in a footnote.
- Left to spend still counts the cash, so it matches what's really in your account.
You can link or unlink later by editing the payback. Several people can pay back one expense, and a payback larger than the expense is allowed: the extra counts as a plain reimbursement.
09
Goals and debts
 1
2
3
4
5
6
7
1
2
3
4
5
6
7
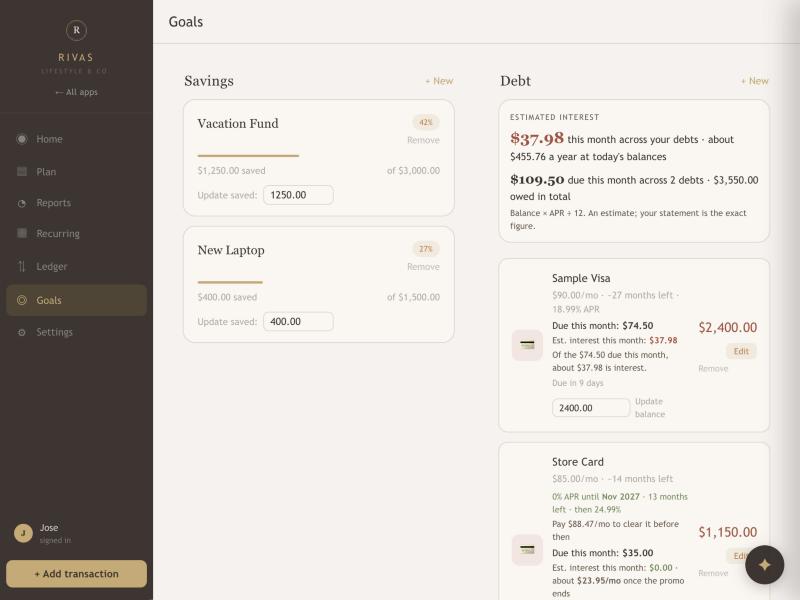
- Savings goal. Progress bar, percentage, and an Update saved box.
- Estimated interest. What you'd pay this month across all debts, and about how much per year.
- Due this month, in total. What's due across all your debts this month, next to the total you owe.
- Due this month, per card. The amount from that card's statement. It's separate from the balance on the right, which is the total owed.
- Interest against what's due. This month's estimate, and how much of the amount due is interest.
- Promo countdown. When a 0% rate ends, how many months are left, and what to pay each month to clear the card in time.
- Edit. Change anything about the debt, including this month's amount due.
Add a savings goal
- On Goals, tap + New beside Savings.
- Enter a name, the target amount, and optionally a monthly amount and a target date.
- Save. When you add entries in the Save: your goal category, the saved amount grows. When it reaches the target, the goal completes and moves to the archive.
Add a debt
- On Goals, tap + New beside Debt.
- Enter the name, type, balance, monthly payment and the day it's due each month. If you have this month's statement handy, add Due this month too.
- Enter the interest rate if you know it.
- Save. Update the balance any time using the box on the card.
Due this month, and the total owed
A debt has three different amounts, and it helps to keep them apart:
| Amount | What it means |
|---|---|
| Balance owed | The total you owe on the debt. This is the big number on the right of the card. |
| Monthly payment | What you plan to pay each month. The payoff advisor and the "months left" estimate use this. |
| Due this month | What the card or lender says is due this month, from the statement. It can change every month. |
- Tap Edit on the debt.
- Enter the amount from this month's statement in Due this month.
- Save.
The card then shows Due this month under its name, the interest line compares the estimate to that amount, and the total appears at the top of the debts column. The Home Payment due and This week tiles use it too.
Because the amount changes monthly, "Due this month" only counts during the month you entered it. After that the card shows Add this month's amount due as a reminder, and the tiles go back to your monthly payment until you enter the new amount. Leave the box empty to clear it.
Track a 0% promo rate
If a card has a promotional rate that expires, tell the app when.
- Tap Edit on the card.
- Set the interest rate to the promo rate (usually 0).
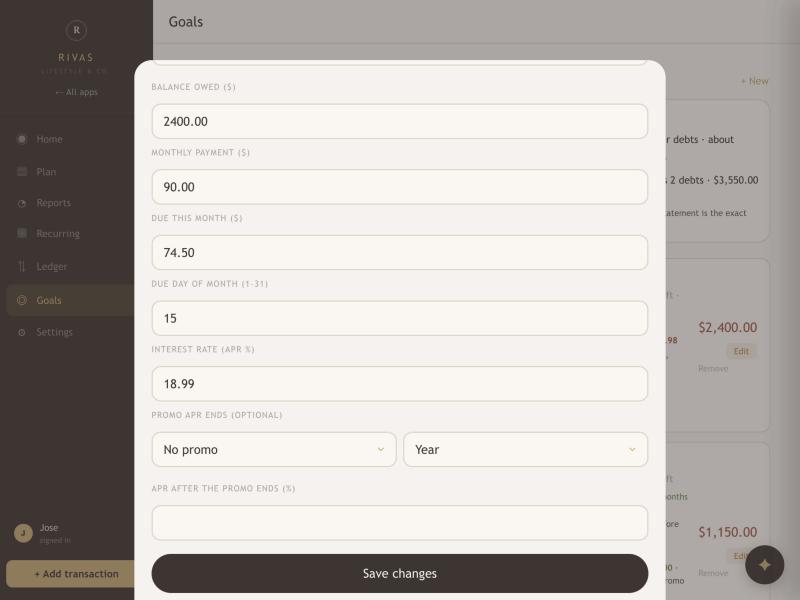
- Under Promo APR ends, choose the month and year.
- Enter the APR after the promo ends from your statement, so the app can estimate what's coming.
- Save.
 1
2
3
1
2
3
- Due this month. This month's amount from the statement.
- Interest rate. The rate you pay today.
- Promo APR ends. Month and year.
The app then shows the countdown on the card and on Home, warns you as the date gets close (from 6 months out), and starts charging interest in its estimates from the promo month onward. It counts the month you choose as the first month of interest, so it errs a few weeks early rather than late.
Payoff advisor
Below your debts, the advisor compares three ways to pay them down: Planned (just your scheduled payments), Avalanche (extra money to the highest-rate debt first, which saves the most interest) and Snowball (smallest balance first). It shows the order, an estimated payoff date for each, and the interest saved.
Interest figures are estimates (balance × rate ÷ 12). Your statement is always the exact number. Debts with no monthly payment entered can't be given a payoff date.
10
Recurring bills
Add rent, subscriptions and paychecks once, and they're entered for you every month.
- Open Recurring and tap + New.
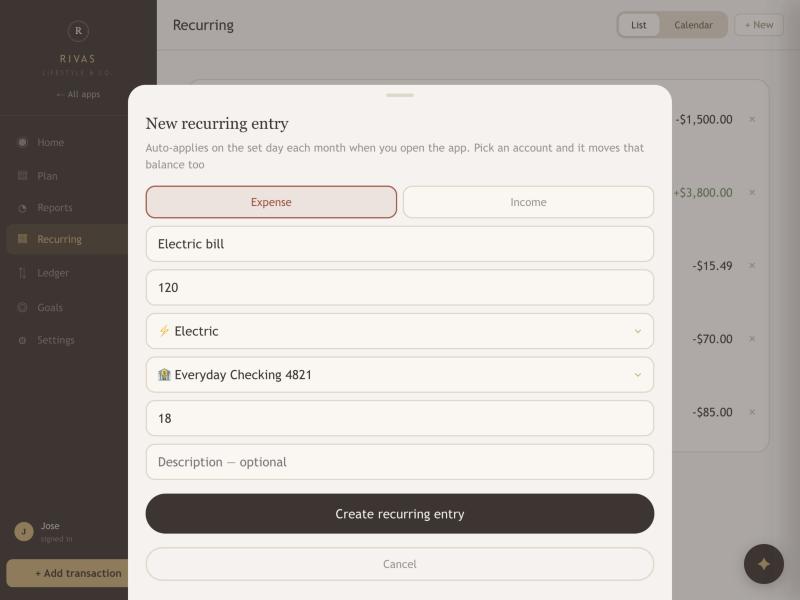
- Choose Expense or Income, enter the name, amount, category and the day of the month (1 to 31).
- Pick the account it comes out of, or goes into. This is optional.
- Save. On that day each month, the entry is added the next time you open the app.
 1
1
- Account. Each month's entry is added to this account, so its balance drops (or rises, for income) on the due day.
The entry appears when you open the app on or after the due day. If you haven't opened it for a few days, it's added with the right due date anyway, and the account balance counts it from that date.
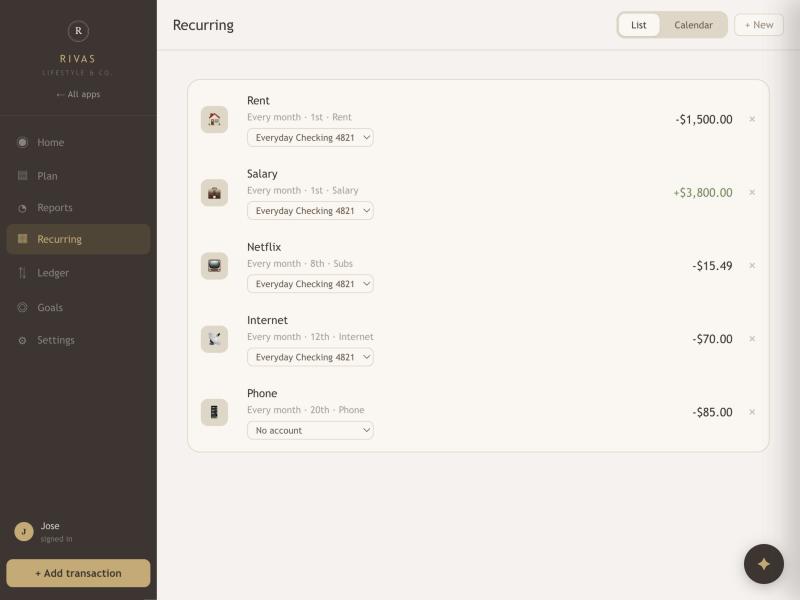
Link an existing bill to an account: choose the account in the picker under its name. From then on, each month's entry goes to that account. If this month's entry was already added and had no account, it's linked too. Choose No account to unlink it.
Switch to Calendar to see the whole month at a glance.
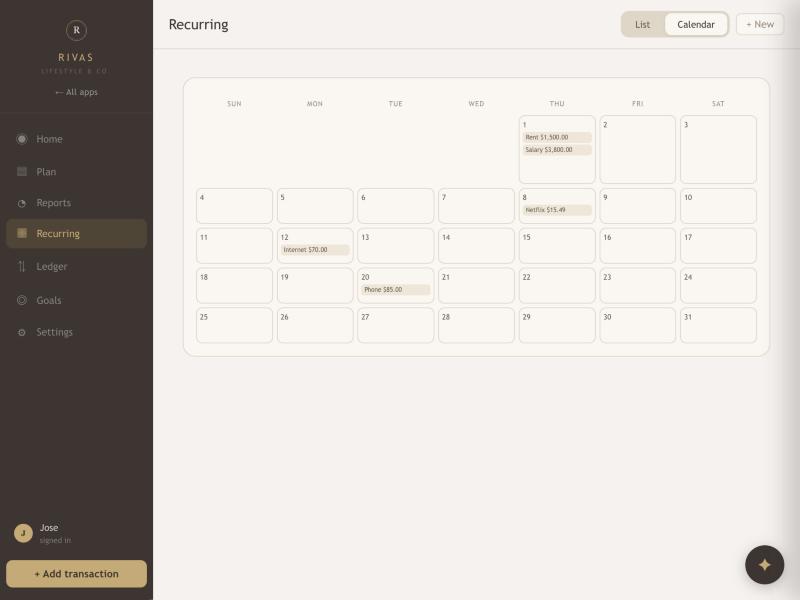
Your recurring bills also feed the Upcoming card and the This week highlight on Home, and the assistant uses them to answer "what's due soon?".
11
Reports
Reports turns your entries into charts. There are three tabs.
- Spending. A donut chart and list of where the month's money went, by category.
- Cash Flow. Income, expenses, what you saved and your savings rate, plus a picture of where income becomes spending.
- Income. Your income by source.
Use the ‹ › buttons at the top to change the month. It's the same month as Home and Plan.
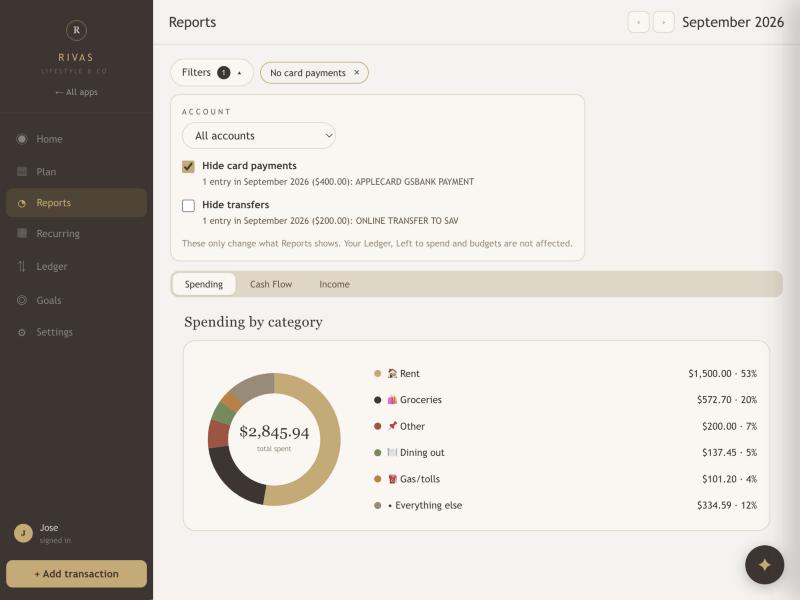
Filters
Reports start by showing everything. Tap Filters to narrow things down.
 1
2
3
4
5
6
7
1
2
3
4
5
6
7
- Month.
- Filters button. Opens and closes the panel. The number shows how many filters are on.
- Active filter chip. Always visible, even when the panel is closed. Tap × to remove it.
- Account. Show one account only.
- Hide card payments. Leaves out payments to credit cards, so a $400 card payment doesn't look like spending.
- Hide transfers. Leaves out money moved between your own accounts.
- Tabs.
Each switch tells you what it will hide in the month you're viewing, with a count, a total and examples, so you can check it. These filters only change what Reports shows. Your Ledger, Left to spend and budgets are not affected.
If a card payment isn't being caught, it's usually because your bank words it differently. The app looks for terms like "AUTOPAY", "CARD PAYMENT" and "APPLECARD". Person-to-person payments such as Zelle are never hidden.
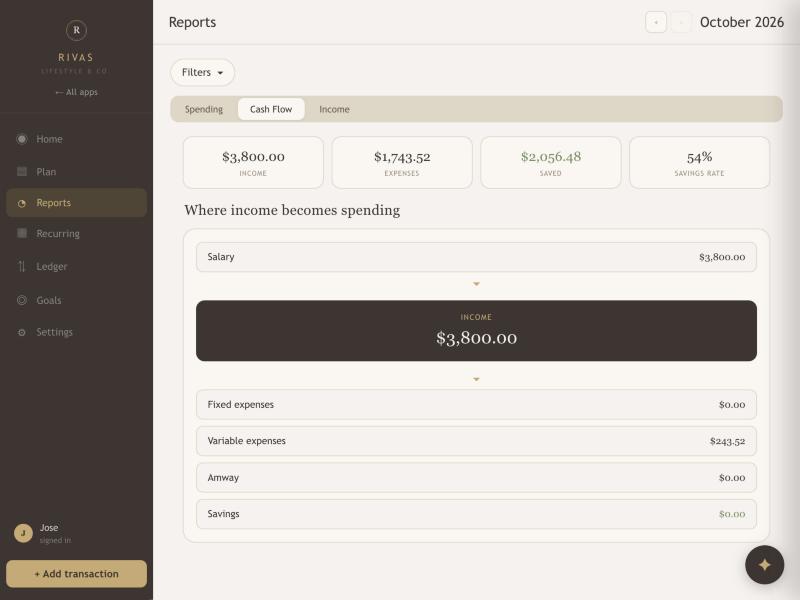
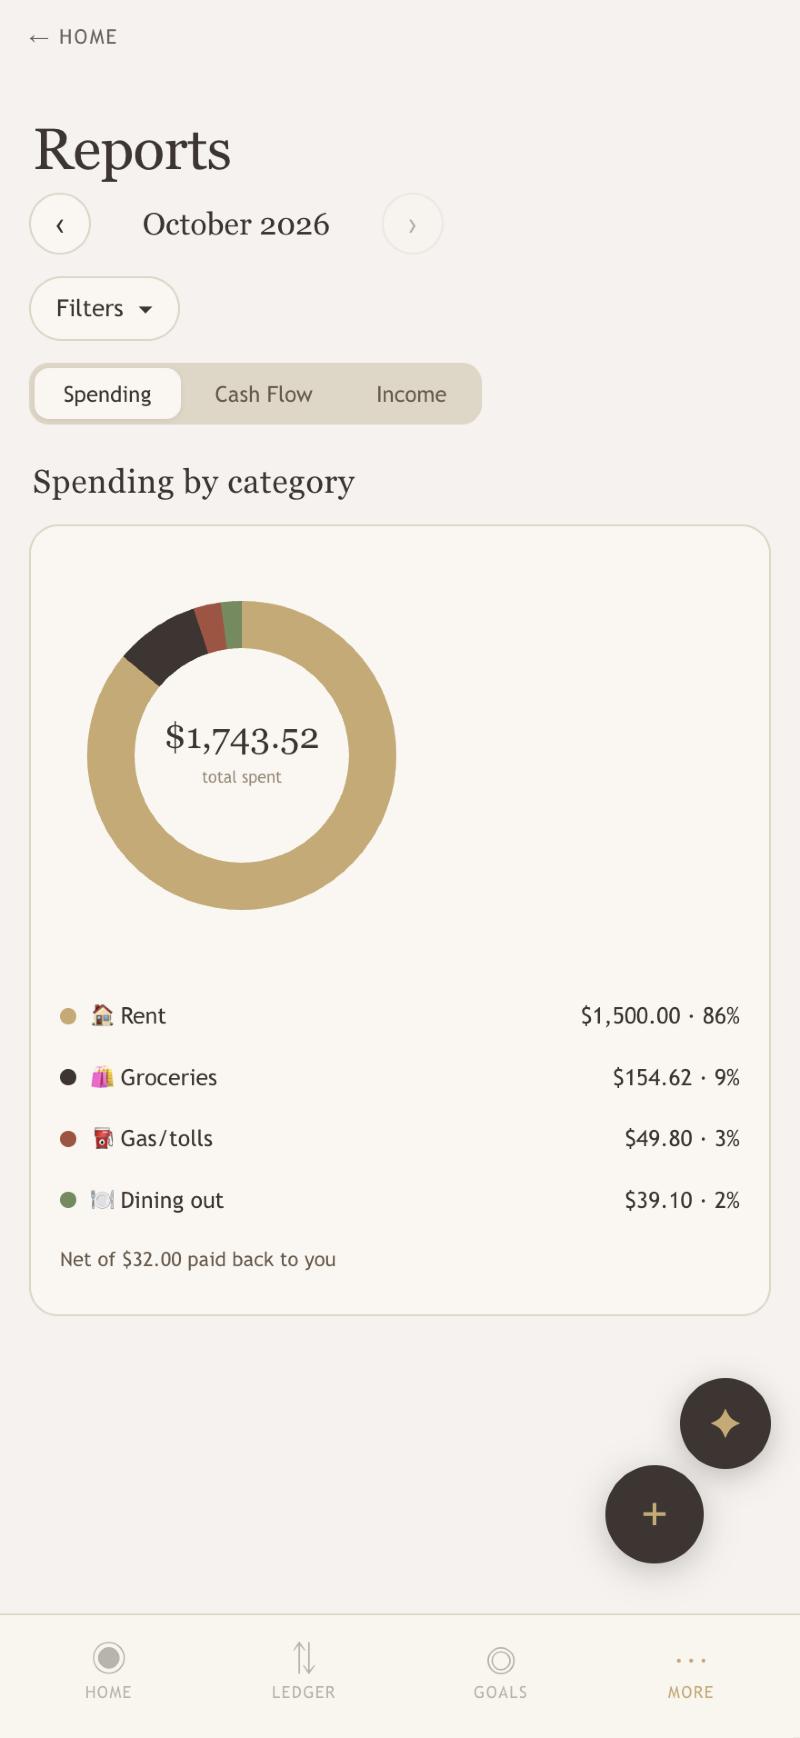 1
2
3
1
2
3
- Month.
- Filters.
- Spending, Cash Flow, Income.
On the phone, find Reports under the More tab.
12
Budget Assistant
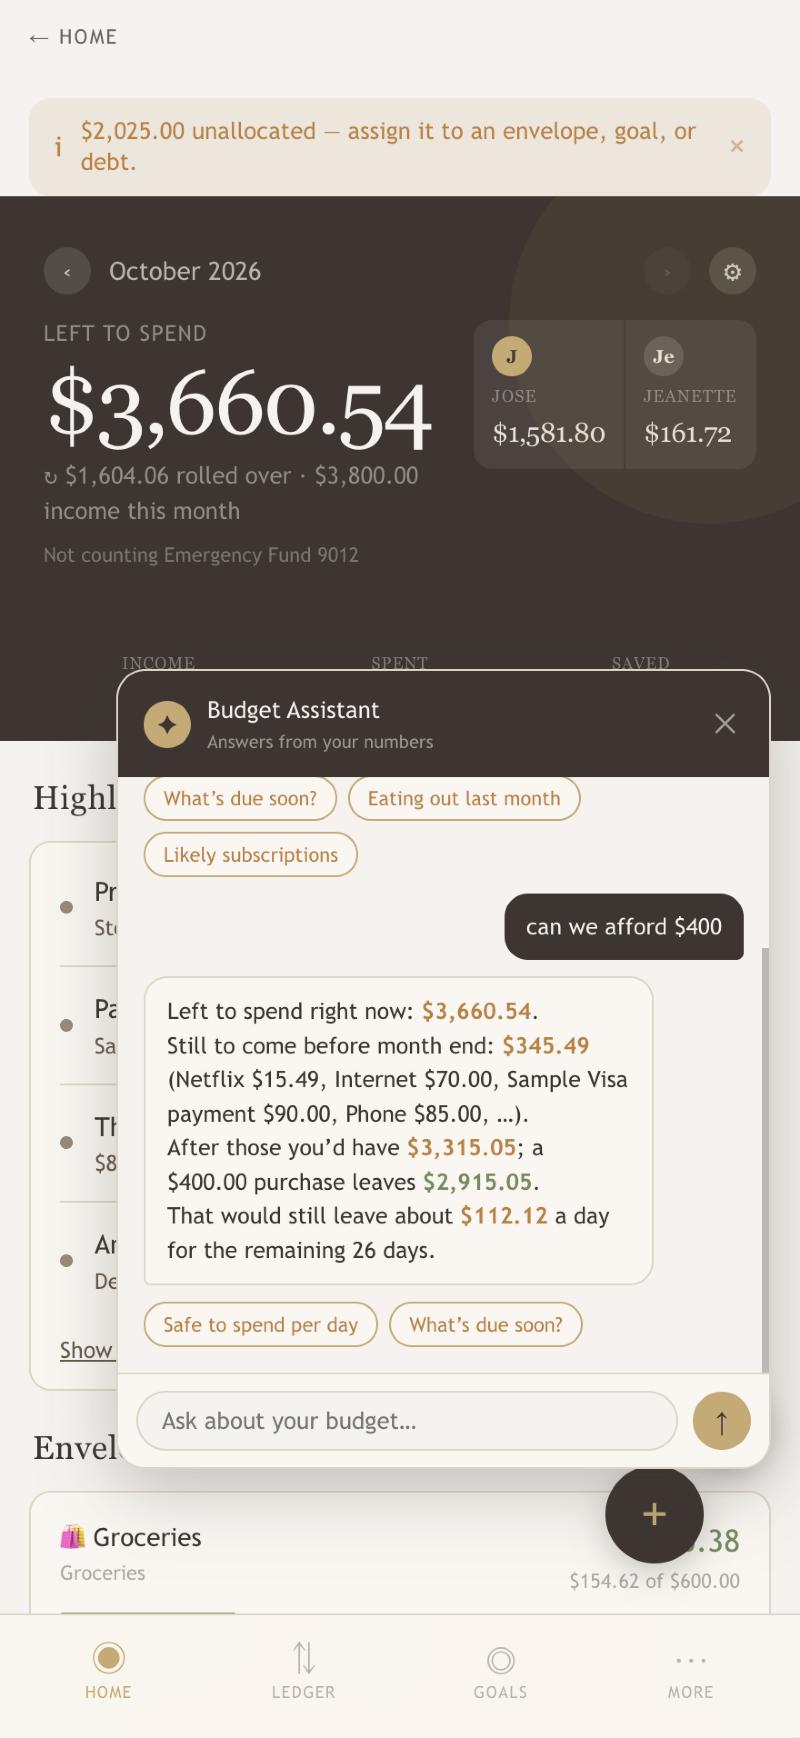
Tap the gold ✦ button in the corner and ask a question in plain English. It answers from your own numbers.
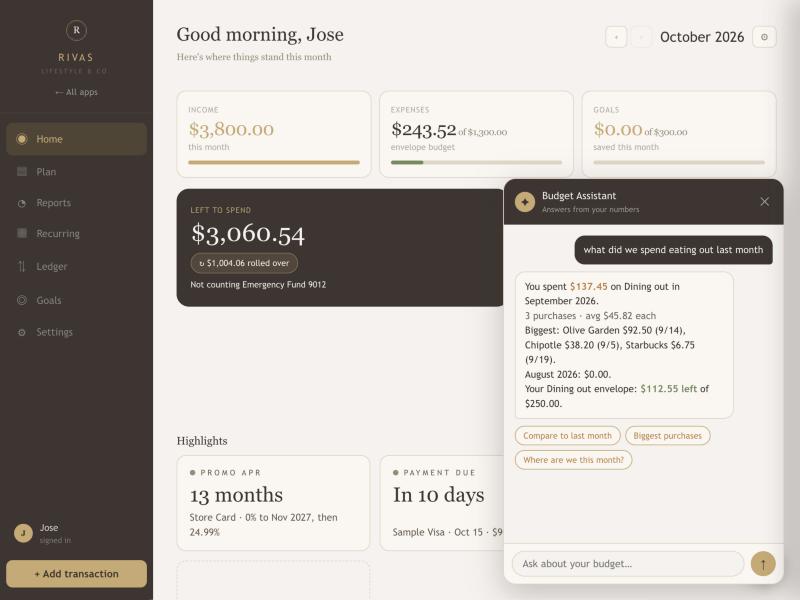 1
2
3
1
2
3
- The answer. Total, number of purchases, biggest items, comparison with the month before, and your envelope status.
- Follow-up chips. Tap one to keep going.
- Ask box. Type your question.
When you open it, it may show a short Heads-up about anything urgent, like a payment due or an envelope that's over.
What you can ask
Spending
What did we spend eating out last month?Groceries in SeptemberHow much at Costco this year?Spending on gas, last 3 monthsHow much did Jeanette spend on dining?Amway expenses this year
You can name any month, "last month", "this year", "last 3 months", "yesterday" or "all time". It understands your own categories, store names, a person, an account, and small typos.
Understanding your numbers
Why did my spending go up?Why is my left to spend what it is?Biggest purchases last monthWhere do we spend the most?Compare dining to last month
Looking ahead
What's due soon?Can we afford $400?Safe to spend per dayWill we make it to the end of the month?
Money you could save
Find my subscriptionsAnything unusual?What if we cut dining out by $100 a month?
Debts and goals
How much interest am I paying?When will we be debt free?Which debt first?What if I pay $500 a month on my Visa?What do I need to pay before the promo ends?Am I on track for my goals?
Check-ups
What needs attention?How much cash do we have?Help
 1
2
1
2
- Your question.
- The answer. It subtracts bills still due this month before telling you whether a purchase fits.
The assistant runs entirely on your device, and nothing is sent anywhere. It matches your wording against what the app knows rather than chatting freely, so if it misses a question, try rephrasing or type help. It reads from your data, and reimbursements and hidden accounts follow the same rules as the rest of the app.
13
Settings and backups
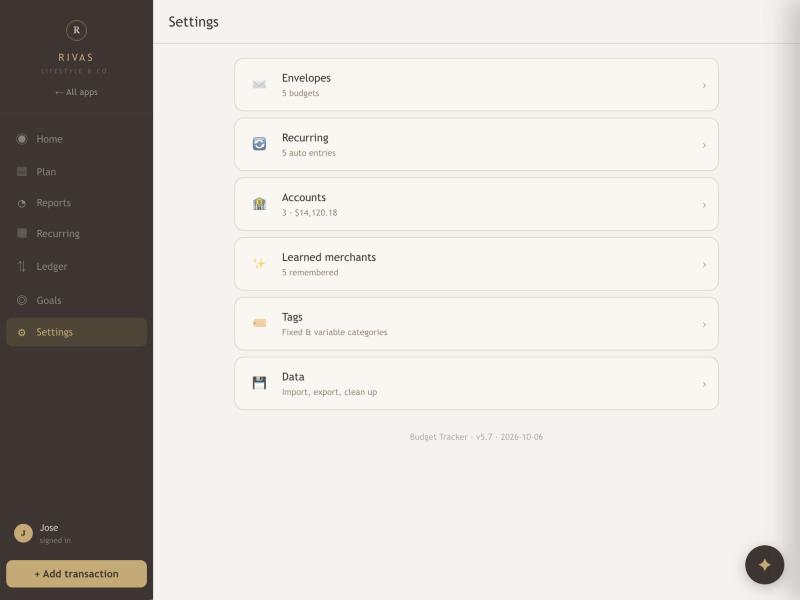
| Item | What it does |
|---|---|
| Envelopes | Create envelopes, change budgets, remove them. |
| Recurring | The same list as the Recurring page. |
| Accounts | Add, edit or delete bank accounts, and hide them from Left to spend. |
| Learned merchants | Stores the app has learned a category for. Tap Forget to unlearn one. |
| Tags | Your categories. Rename, change icons, or add new ones. |
| Data | Backups, imports, cleanup and Reconcile. |
Tags (categories)
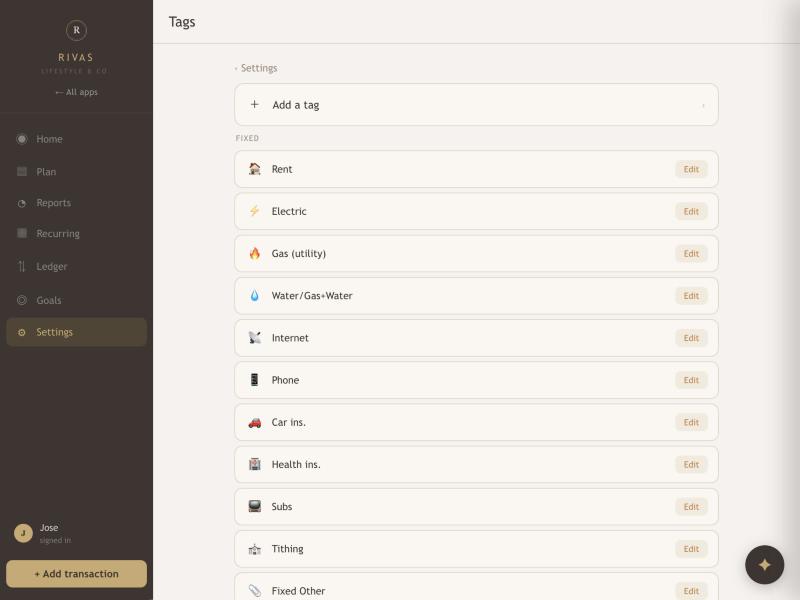 1
2
1
2
- Add a tag. Name, group and icon.
- Edit. Rename or change the icon of any category. You can delete tags you created, and their entries move to Other. Built-in tags can be edited but not deleted.
Data
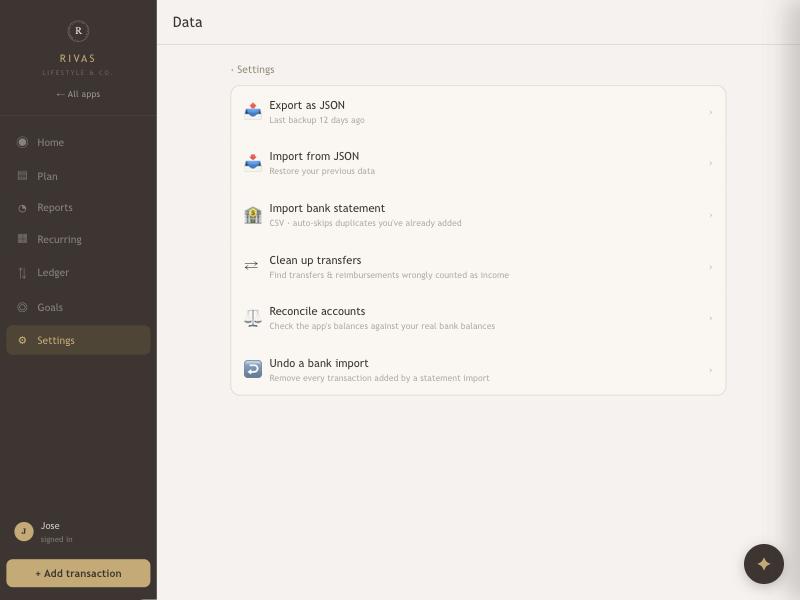
- Export as JSON. Downloads a complete backup of your budget. Do this about once a month and keep the file somewhere safe. Under it the app shows when you last did it on this device, in amber once it has been 30 days.
- Import from JSON. Restores a backup. It replaces everything currently in the app, and asks you to confirm first, so only use it to recover.
- Import bank statement, Clean up transfers, Reconcile accounts, Undo a bank import. Covered in sections 5 and 7.
When a save doesn't go through
Your changes save to the cloud a moment after you make them. If something gets in the way, a bar appears just above the buttons at the bottom of the screen:
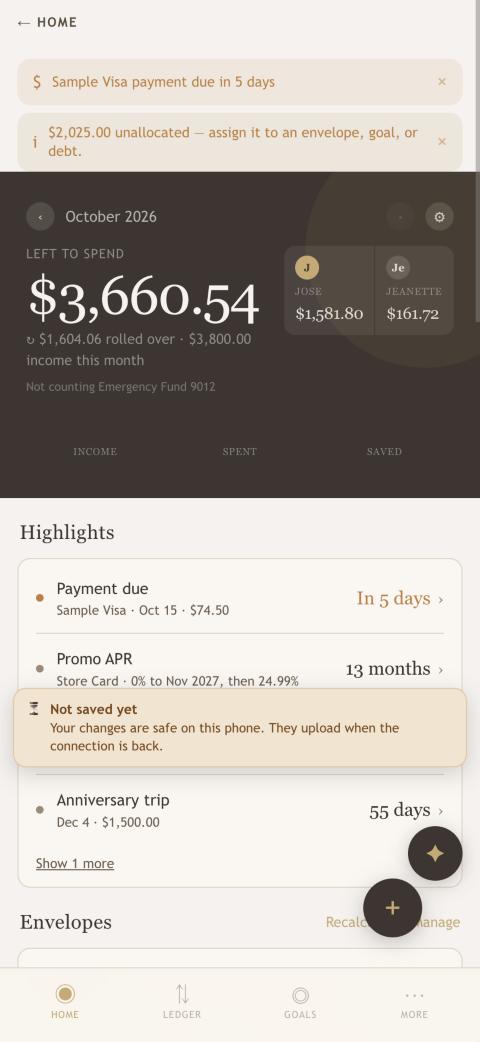
- Not saved yet (amber). The connection is slow or gone. Your changes are safe on this phone and upload on their own when it's back.
- Couldn't save to the cloud (red). The cloud refused the save. Tap Retry. If it asks you to sign out and back in, do that from the home page, then Retry.
- All saved (green). Shows for a moment after a problem clears, then goes away.
You normally never see the bar. If you close the app while changes are waiting, they're uploaded the next time you open it with a connection.
If you both change the budget around the same moment, the app merges the two sets of changes entry by entry. Entries you each added are both kept, and a delete holds. If you both edit the very same entry, the later save wins for that one entry. Totals such as a debt's balance take the later save too, so if you both log a payment to the same debt in the same moment, double-check that balance.
14
How the numbers work
Once you know one formula, every number in the app makes sense.
- "Everything spent" includes debt payments and savings deposits. That money has left your spending pool, even though it's going somewhere good.
- Unspent money carries over. Whatever's left at the end of a month rolls into the next. That's the rolled over chip.
- Reimbursements aren't income. They reduce the cost of what they pay back, but the cash still counts toward Left to spend.
- Hidden accounts are left out of Left to spend, Income, Expenses and envelope progress. They still appear in the Ledger and Reports.
- Left to spend is not your bank balance. It's built from your entries. Reconcile with Anchor my budget ticked is what lines it up with your real cash.
- Home and Reports can differ on purpose. Reports show every account unless you filter, and the report filters never change Left to spend.
The tiles on Home
| Tile | Means |
|---|---|
| Income | Money that came in this month, not counting reimbursements. |
| Expenses | Spending in your envelopes this month, compared with the total of your envelope budgets. |
| Goals | Savings deposited this month, compared with your monthly savings targets. |
| Total cash | The live balances of your accounts that aren't hidden. |
15
Troubleshooting
I don't see a new feature
You're probably on an older copy. Check the version at the bottom of Settings, then refresh with ⌘ Shift R on a computer, or swipe the app away and reopen it on your phone.
Left to spend doesn't match my bank
Left to spend is built from your entries, so it matches your bank only when your entries are complete. Import your latest statements, then go to Settings → Data → Reconcile accounts with Anchor my budget ticked. See section 7.
A number on Home looks too small, or an entry seems to be missing
Check three things. First, the month at the top. Second, whether the entry's account is hidden (hidden accounts are left out of Home's numbers). Third, search for it in the Ledger. It will show there even if Home doesn't count it.
An account balance doesn't match my bank
The balance is your last checked balance plus the entries linked to the account since. Look for entries with no account (Ledger → filter No account specified), entries with the wrong account, or bank charges you haven't entered yet. Then use Reconcile to set the real balance.
A bar says "Not saved yet" or "Couldn't save to the cloud"
See Settings and backups. Your changes are safe on the phone. Check your connection, wait a moment, or tap Retry. If it keeps failing after you sign out and back in, tell Jose.
I imported the wrong file or picked the wrong account
Go to Settings → Data → Undo a bank import, remove that import, and import it again with the right account.
The same charge shows up twice
Open the assistant and ask "Anything unusual?" to see possible double charges. Then delete the extra in the Ledger. When importing, the app skips charges it already has and asks about close matches, so doubles usually come from a hand-entered item plus a bank charge worded differently.
My Spending report is mostly "Other"
Card payments and ATM withdrawals often land in Other. In Reports, open Filters and switch on Hide card payments and Hide transfers. For lasting cleanup, change the category on those entries in the Ledger.
I can't find a category I need
When adding an entry, scroll to the bottom of the category list and tap + New category. Or go to Settings → Tags → Add a tag.
The receipt scan got the wrong total
Reading receipts from a photo isn't perfect. Fix the amount, name or date on the next steps before saving. A flat, well-lit photo works best.
The assistant didn't understand me
Try naming a month and a category, such as "groceries in September". Type help to see example questions.
I want a backup
Settings → Data → Export as JSON. Keep the file in a safe place. It restores through Import from JSON.
What's new, version by version
| Version | Added |
|---|---|
| Before 4.1 | The rebuilt app: Home, Plan, Reports, Recurring calendar, customizable Home and Recalculate budgets. |
| 4.1 | Receipt scanning, + New category while adding, and possible-duplicate checks. |
| 4.2 | Link entries to accounts. |
| 4.3 | Reimbursements. |
| 4.4 | Account filters and per-account Reconcile. |
| 4.5 | Split by any category, and create envelopes while splitting. |
| 4.6 - 4.7 | 0% promo tracking and monthly interest estimates. |
| 4.8 - 4.9 | A much smarter assistant. |
| 5.0 | Home highlights and hiding accounts from Left to spend. |
| 5.1 - 5.2 | Month selector and filters on Reports. |
| 5.3 | Clickable highlight tiles, and a Budget guide link on the home page. |
| 5.4 | A ← Home button at the top of every phone screen, in the same place as the other two apps. |
| 5.9 | A bar tells you when a save is stuck or refused, and tries again on its own. Changes you and Jeanette make at the same time are merged instead of one overwriting the other. Edits made offline are uploaded when you reopen the app. Export shows the date of your last backup. |
| 5.8 | Account balances update from the entries you link to them, everywhere they're shown. Recurring bills can be linked to an account and are added to it automatically. |
| 5.7 | Each debt has a Due this month amount, separate from the total balance and from your monthly payment. |
| 5.6 | The ← Home button now scrolls with the page instead of staying pinned, which fixes blurry text on newer iPhones. |
| 5.5 | Sharper, easier-to-read ← Home button on the phone. |