Rivas Lifestyle & Co.
The Rivas Business Tracker Guide
Everything the Business Tracker can do, in the order you'll probably use it. Written for Jose and Jeanette, current as of version 3.8.
Jump to a section
Every screenshot in this guide uses made-up names and numbers, so none of your real contacts appear here. Your own screen will look different. The gold numbered dots on the screenshots match the numbered lists beneath them.
| Version | What changed |
|---|---|
| 3.8 | A bar tells you when a save is stuck or refused, and tries again on its own. Export shows the date of your last backup. |
| 3.7 | The ← Home button now scrolls with the page instead of staying pinned, which fixes blurry text on newer iPhones. |
| 3.6 | Sharper, easier-to-read ← Home button on the phone. |
| 3.5 | Sales can be sent to a Google Sheet automatically. New sales add a row, deleted sales remove it, and you can send past sales from any date. Set it up in Settings. |
| 3.4 | Every logged sale now records how they paid: Cash, Check, Zelle, Venmo, or Other with your own text. |
| 3.3 | A ← Home button at the top of every phone screen, in the same place as the other two apps. It replaces the All apps link that used to be on the More page. |
| 3.2 | DTM is now spelled out correctly as Dropped the Message on Today and in Settings. |
| 3.1 | Phone numbers now format themselves as you type, as (555) 123-4567. The parentheses and dash appear automatically when you add a prospect, customer or Reconnect contact, when you edit a number, and when you import contacts. |
| 3.0 | The whole app was redesigned. A sidebar on the computer, five tabs on the phone, a new Today page, a drag-and-drop Board for the pipeline, Reconnect as its own page, a Team table, and detail panels that slide in from the right. |
01
Getting started
The Business Tracker lives at rivas-lifestyle.pages.dev/tracker, or tap the Business Tracker card on the Rivas home page. It works on a computer and on your phone. Both show the same data in real time, so something Jeanette logs on her phone shows up on Jose's computer right away.
On the Rivas home page, look under the Sign out button for Business guide. You can also go straight to rivas-lifestyle.pages.dev/guide/business. You need to be signed in to open it.
Put it on your iPhone
- Open the tracker link in Safari and sign in if it asks.
- Tap the Share button, then Add to Home Screen.
- From then on, open it from the new icon. It runs full screen like a regular app.
Finding your way around
| Area | What it's for |
|---|---|
| Today | Your starting point. Your SYS and DTM counts, your streak, and everything that needs you today. |
| Pipeline | Every prospect, from first contact to launch, on a Board or a List. Customers live here too. |
| Reconnect | Five old contacts a day to reach out to again. |
| PV | Your personal PV and your customer sales, month by month. |
| Team | Everyone on your team with their PV, bonus level and VCS. |
| Reports | Weekly and monthly numbers, the funnel, and a PDF you can export. |
| Settings | Daily goals, notifications, and backups. |
On a computer these are in the dark sidebar on the left. The sidebar also has ← All apps to go back to the Rivas home page, your name, and a gold + Add button.
On the phone you get five tabs along the bottom: Today, Pipeline, Reconnect, PV and More. More holds Team, Reports and Settings. At the very top of every phone screen there is a ← Home button. It takes you back to the Rivas home page, and it sits in the same place in the Budget Tracker, the Business Tracker and the Habits Tracker. On a computer, use ← All apps at the top of the sidebar instead.
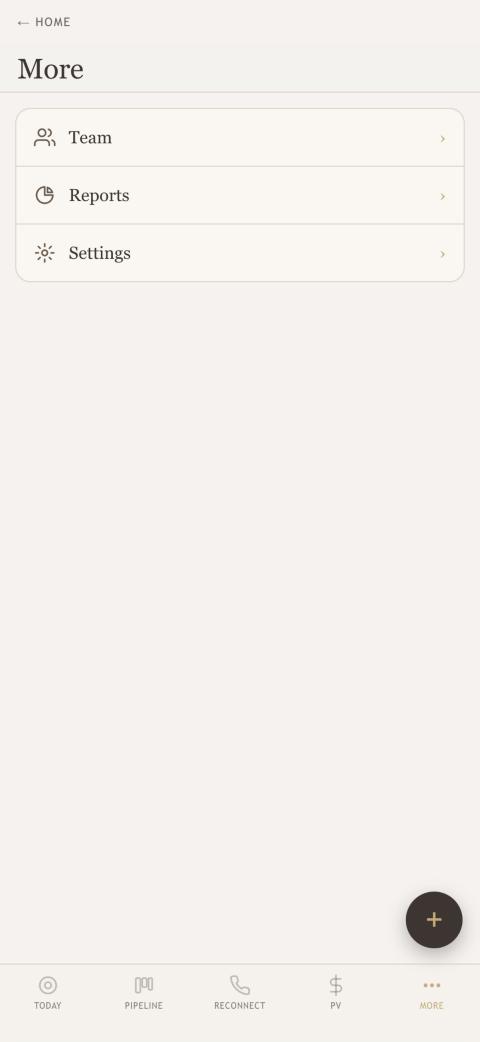
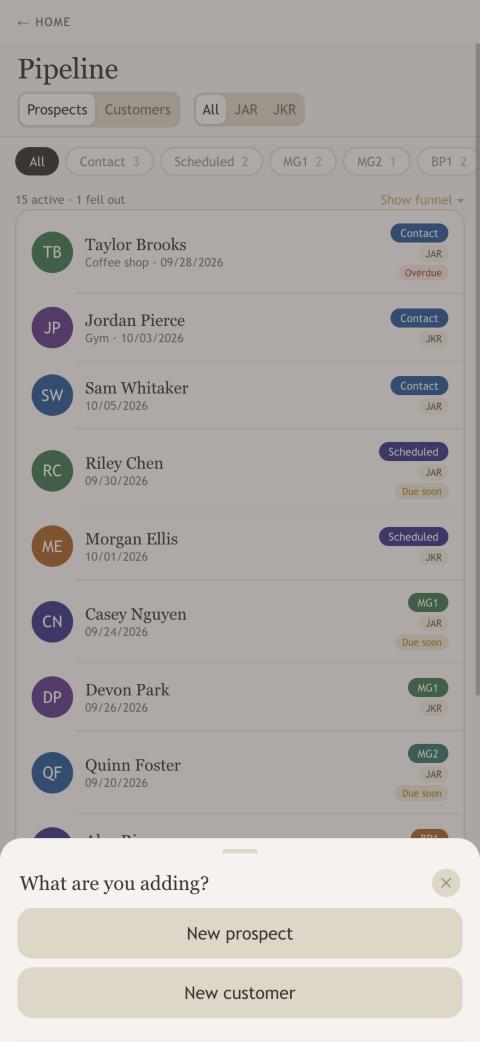
The + button
On the phone, a round + floats above the tab bar on every page. Tap it and it offers only what makes sense for the page you're on. On PV it offers Log PV or sale. On Team it offers Team member. On Today it offers everything. On a computer, the gold + Add button in the sidebar does the same job, and each page also has its own labeled button in the top right, such as Add prospect.
Making sure you have the latest version
The version number is at the bottom of Settings, like Business Tracker · v3.8. After an update, refresh once with ⌘ Shift R in Safari on a computer. On the phone, swipe the app away and open it again.
02
Today
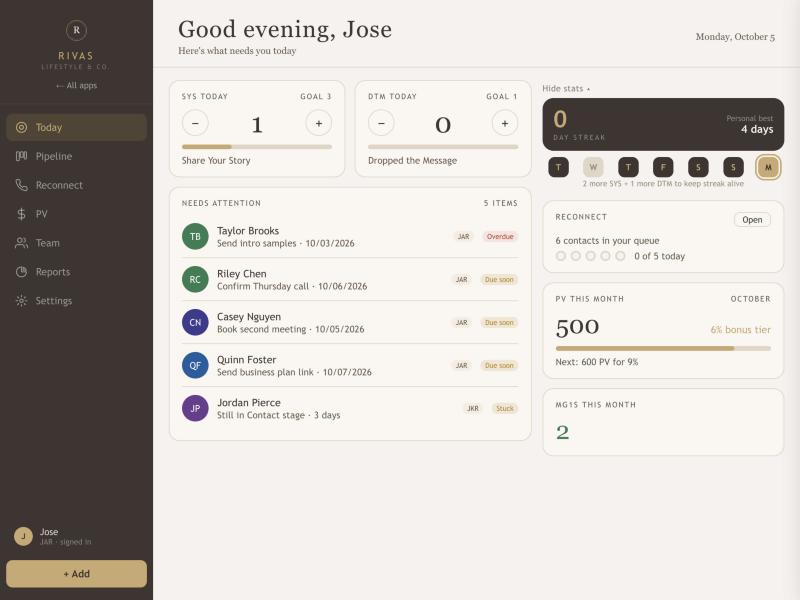
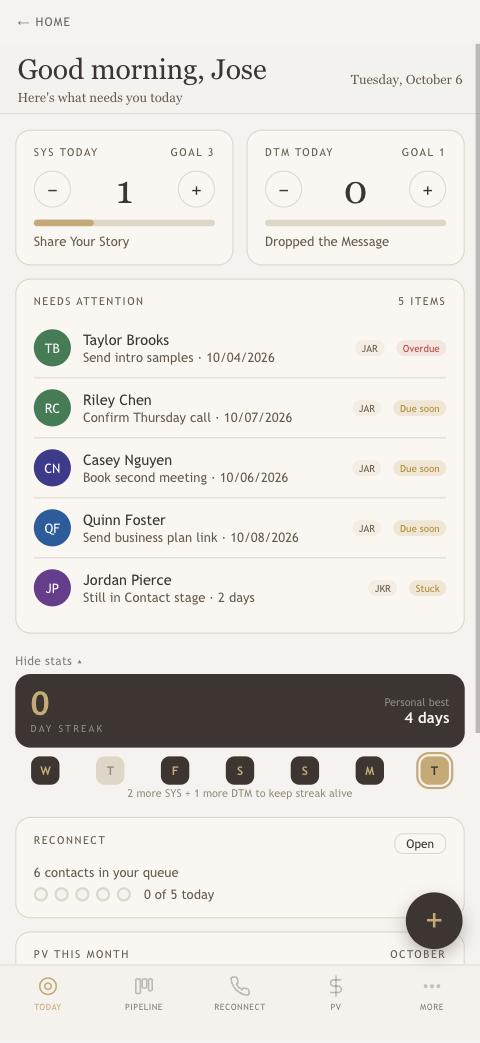
Today answers one question: what needs me right now? It's the first page you see when you open the tracker.
 1
2
3
4
5
6
1
2
3
4
5
6
- SYS and DTM counters. Tap + each time you share your story (SYS) or drop a message (DTM, short for Dropped the Message). Tap − to fix a mistake. The bar fills toward your daily goal and turns dark when you reach it. Change your goals in Settings.
- Needs attention. The people to deal with today, most urgent first. Tap anyone to open their details.
- Streak. How many days in a row you've hit both goals, your personal best, and the last seven days. Tap Hide stats to collapse it to one small line.
- Reconnect. How many contacts are in your queue and how many of today's five you've done. Open goes to the Reconnect page.
- PV this month. Your PV so far, your bonus level, and how far it is to the next level.
- MG1s this month. How many prospects reached their first meeting this month.
What counts as "needs attention"
| Label | When it appears |
|---|---|
| Overdue | The prospect's next action has a date that has already passed. |
| Due soon | The next action is due within the next 3 days. |
| Today | You set a reminder for them for today. |
| Snoozed | A snoozed prospect wakes up today. |
| Stuck | They've been in the Contact stage for 2 days or more with no progress. Only the first three are listed. A note under the list says how many more are waiting, and you'll find them all in Pipeline. |
Each person appears once, using their most urgent reason. If the list shows Nothing needs you right now, you're caught up.
03
Pipeline
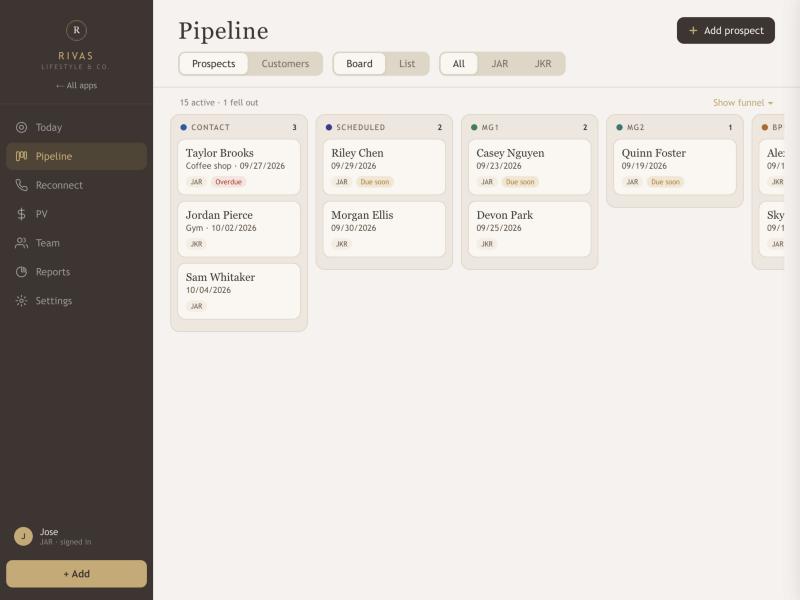
Pipeline holds every prospect you're working with. A prospect moves through nine stages:
Contact → Scheduled → MG1 → MG2 → BP1 → FU1 → BP2 → FU2 → Launch
(MG is a meeting, BP a business plan, FU a follow-up.) Anyone who drops out goes to Fell Out, and anyone you want to hear from later can be Snoozed.
The Board (computer)
 1
2
3
4
5
6
7
1
2
3
4
5
6
7
- Prospects / Customers. Switch between people you're recruiting and people who buy from you.
- Board / List. Choose how Pipeline looks. The app remembers your choice.
- All / JAR / JKR. Show everyone's prospects, or only Jose's or Jeanette's.
- Add prospect. Starts a new prospect (see section 4).
- Stage column. Each stage has its own column. The number is how many prospects are in it.
- Prospect card. Name, where you met, date, who owns it, and an Overdue or Due soon tag when a next action needs attention.
- Show funnel. A bar chart of how many prospects reached each stage and where people drop off.
Pick up a card and drop it on another column to move that prospect to that stage. The date is recorded for you. If you drop someone on Launch, a short prompt asks for their IBO number and whether to add them to your team (see section 4). If you drop a snoozed prospect on a stage, they wake up and move there. Click a card, rather than dragging it, to open their details.
Two extra columns sit at the far right. Snoozed holds prospects you've paused, with the date they wake up. Fell out holds people who dropped out. Neither is a place to drop cards.
The List (and the phone)
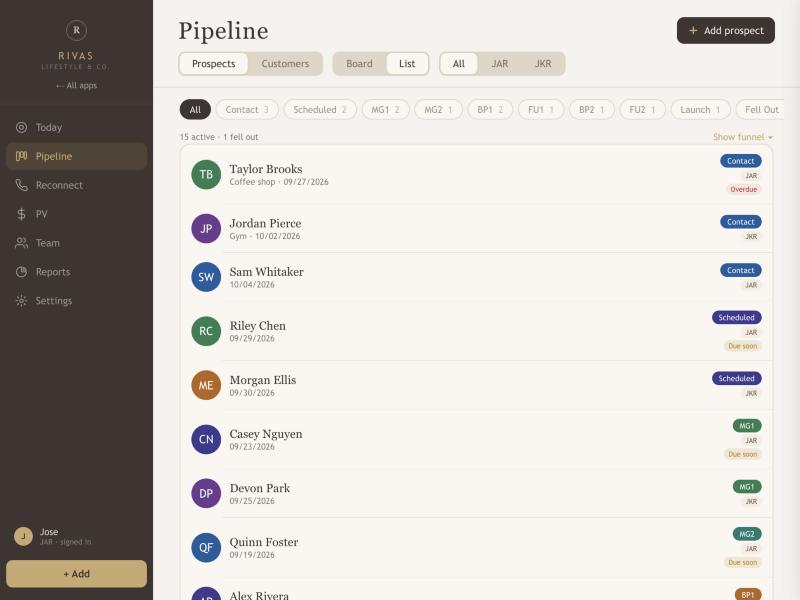
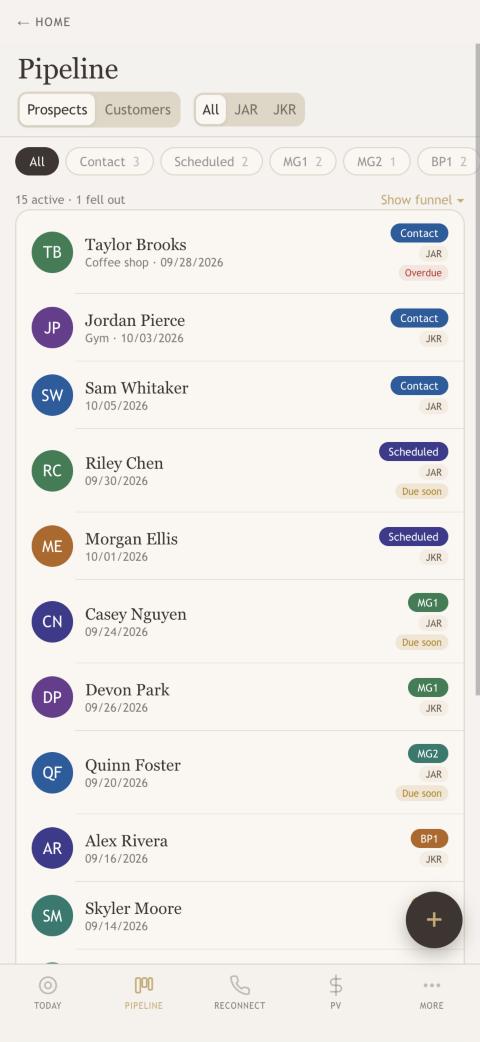
The List is what you see on a phone, because a nine-column board doesn't fit. Tap a chip such as MG1 to see only that stage, or All for everyone who is still active. Fell Out and Launch are kept out of All so the list stays focused. Snoozed prospects are tucked into a Snoozed button at the bottom of the list.
04
A prospect, step by step
Add a prospect
- On a computer, click Add prospect on the Pipeline page, or tap the + button on a phone and choose New prospect.
- Fill in the Name. Where you met, Phone, Notes and the Date met are optional but useful. For the phone number, just type the ten digits. The app adds the parentheses and dash for you, so 5551234567 becomes (555) 123-4567. The same happens for customers, Reconnect contacts, edited numbers and imported contacts.
- The Owner is set to you. Switch it to JAR (Jose) or JKR (Jeanette) if you're adding it for the other person.
- If you want a nudge, set a Reminder date and time. It repeats daily at that time until the prospect moves to a new stage.
- Tap Add prospect. They start in the Contact stage.
The details panel
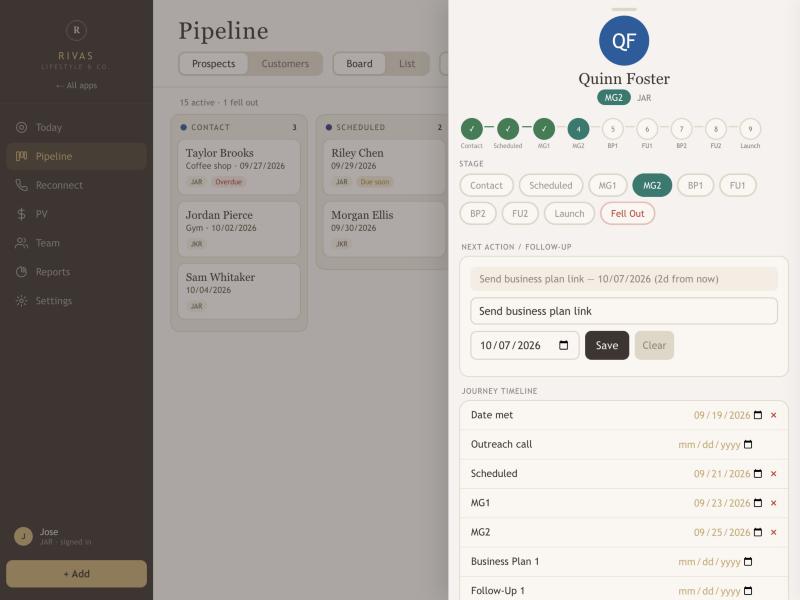
Click any prospect, on the Board or the List, and a panel slides in from the right on a computer (on a phone it rises from the bottom). Nothing is hidden behind it. Close it and you're right back where you were.
 1
2
3
4
1
2
3
4
- Stage stepper. Shows how far along they are. Green checks are the stages they've completed.
- Stage buttons. Tap a stage to move them there. Fell Out sits at the end in red.
- Next action / follow-up. Write what you'll do next (for example "Send business plan link") and the date. It shows on Today when the date is close or has passed. Clear removes it.
- Journey timeline. The date they reached each stage. Tap a date to correct it, or the red ✕ to clear one.
Below the timeline, a Details section lets you tap Name, Where met, Phone, Owner or Notes to edit them. Under that are Reminder, Snooze and Delete contact. To mark someone as fell out, tap Fell Out with the stage buttons.
Snooze, fall out, launch
| Action | What it does |
|---|---|
| Snooze | Pauses a prospect. Pick 2 weeks, 1 month, 3 months or a custom date. They leave the active list, wait in the Snoozed column, and come back at their old stage on the morning they wake up (they'll show on Today). Wake up now brings them back early. |
| Fell Out | Moves them out of the active pipeline. You can pick a reason (optional) and the date. They stay in the Fell out column and in your reports. Open their details and tap Reinstate to put them back in the pipeline. |
| Launch | The big one. A prompt asks for their IBO number (optional, you can add it later). Add to team & mark launched creates them on your Team page so their Amway numbers link up on the next CSV import. Mark launched only skips that. Either way they leave your active pipeline but still count in your launch stats. |
05
Customers
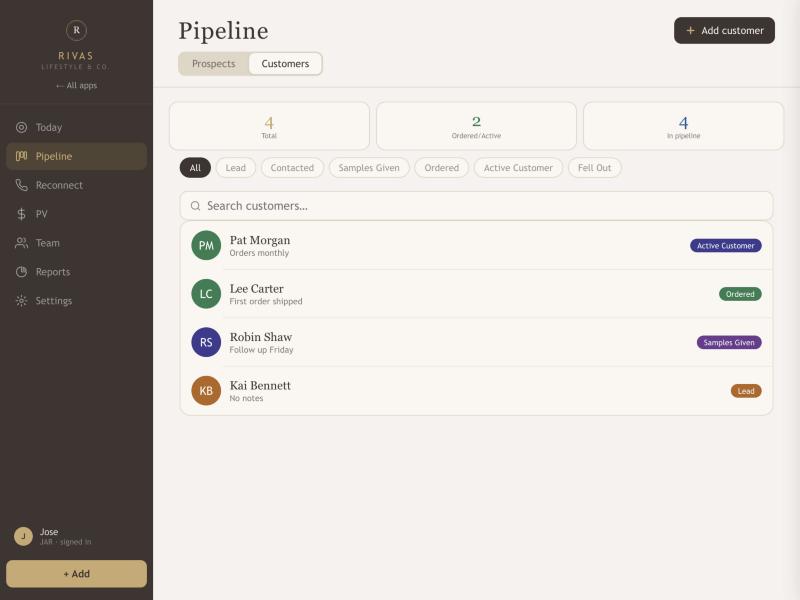
On the Pipeline page, switch to Customers for the people who buy from you rather than the people you're recruiting.
 1
2
3
4
1
2
3
4
- Totals. How many customers you have, how many have ordered, and how many are still moving through the stages.
- Stage chips. Lead → Contacted → Samples Given → Ordered → Active Customer, plus Fell Out.
- Search. Type part of a name to narrow the list.
- Add customer. Name, phone, email, address and notes.
Click a customer to open their details. Tap a stage button to move them along, tap Name, Phone, Email, Address or Notes to edit them, or Delete customer to remove them. Customers are kept separate from prospects, so a customer never shows up on the Board.
06
Reconnect
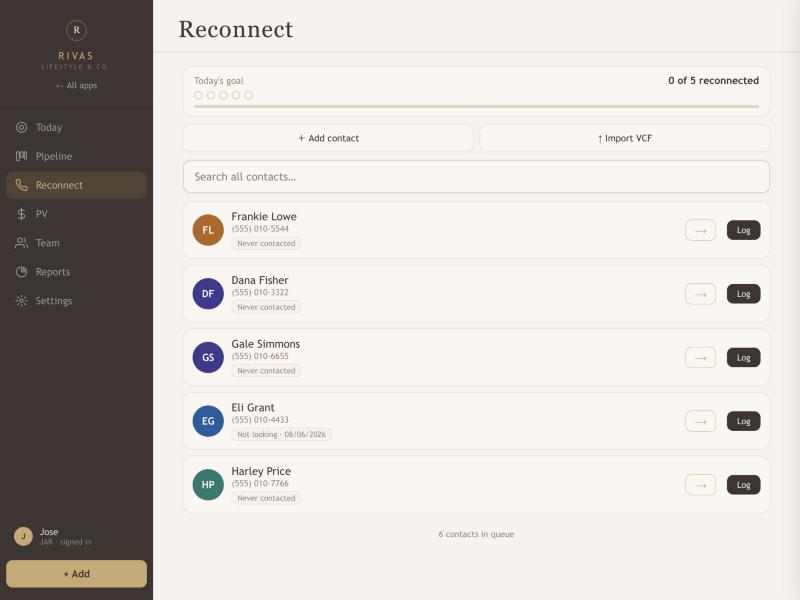
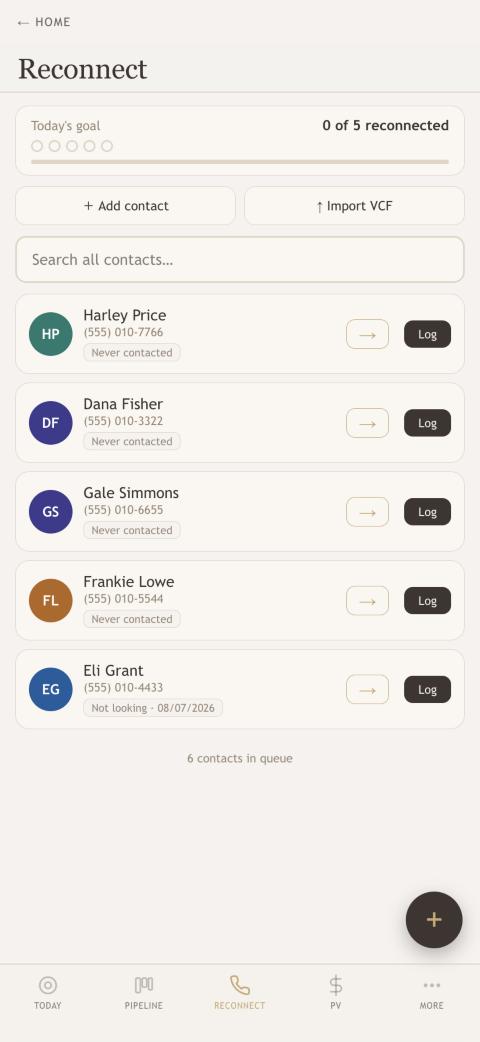
Reconnect is a daily habit for the people you used to know. Load in your old contacts once, and the app hands you five a day. The goal is simple: reach out to all five.
 1
2
3
4
5
6
7
1
2
3
4
5
6
7
- Today's goal. Five dots fill in as you reconnect with people.
- Add contact. Add one person: name, phone and optional email.
- Import VCF. Bring in many contacts at once from a contact file exported from your phone's address book.
- Search. Look through your whole list, not just today's five.
- Contact card. Name, phone, and a small tag for the last time you reached out (or "Never contacted").
- → Send. Pass this contact to the other person (see below).
- Log. Record how it went.
Logging how it went
Tap Log and choose what happened:
| Choice | What happens | Counts toward 5? |
|---|---|---|
| Reconnected, Interested | They move to your Pipeline as a new prospect in the Contact stage and leave your Reconnect list. | Yes |
| Reconnected, Not looking | You pick a follow-up date. They rest until then and then return to your list. | Yes |
| No Answer | They rest for six months, then come back. | No |
| Number Inactive | Removed from your list. | No |
| Never Call Again | Removed from your list. | No |
| Already in Business | Removed from your list. | No |
| Archive | Removed from your list. | No |
You can add a short note to any of them. Each contact keeps a history of every time you reached out.
Sending a contact to the other person
If Jeanette would connect better with someone on Jose's list (or the other way around), tap the arrow → on their card, add a note such as "She'd connect better with you", and send it. It shows up on the other person's Reconnect page with your note, and they choose Reach out today or Save to my list.
07
PV
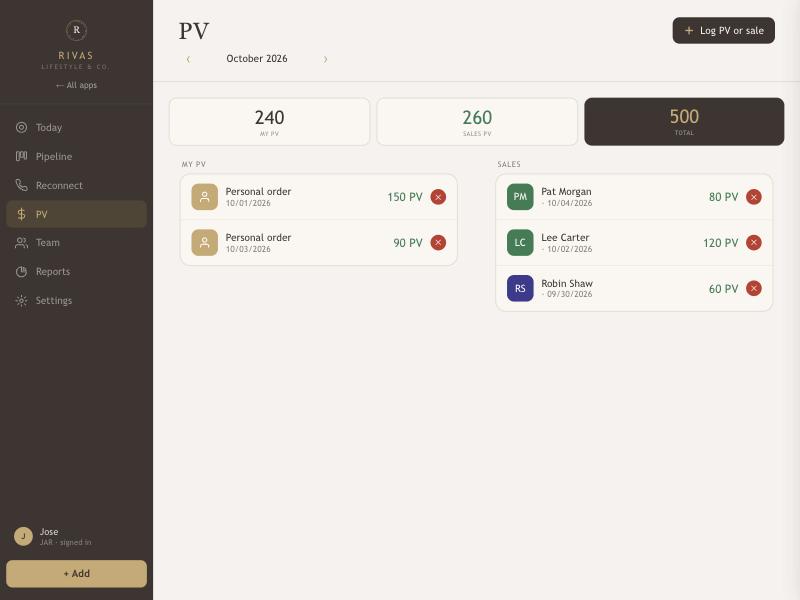
PV keeps a running total of the volume you generate each month, split into your own purchases and what your customers buy.
 1
2
3
4
5
1
2
3
4
5
- Month buttons. Step back or forward to see another month.
- Log PV or sale. Choose Personal (your own PV, date and amount only) or Customer (a sale with the customer's name, product, PV, revenue and how they paid).
- Totals. My PV, Sales PV, and the Total in the dark tile. The total is what your bonus level is based on.
- My PV. Each personal entry. Tap the red ✕ to delete one.
- Sales. Each customer sale, with the customer and date.
Log a customer sale
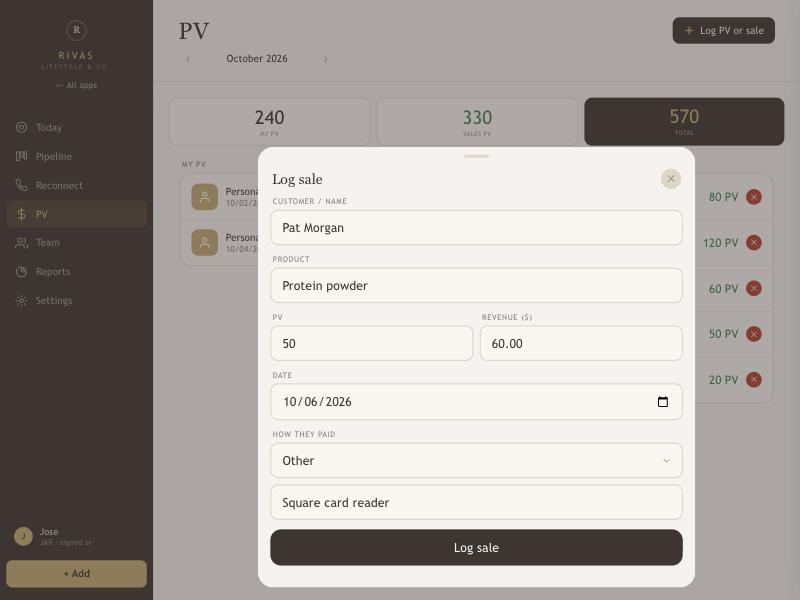
Choose Customer after tapping Log PV or sale. Fill in who bought, what they bought, the PV and the revenue, and the date. Then say how the sale happened.
 1
2
1
2
- How they paid. Choose Cash, Check, Zelle or Venmo. It's required, so every sale has one.
- Other. If none fit, choose Other and a box appears. Type how the sale happened, for example "Square card reader".
The payment method shows next to the sale on the PV page, after the product and date. Sales logged before version 3.4 don't have one. Want every sale in a Google Sheet too? See Send your sales to a Google Sheet.
On the phone, the lists stack one above the other. Today also shows your PV and bonus level so you don't have to come here to check.
08
Team
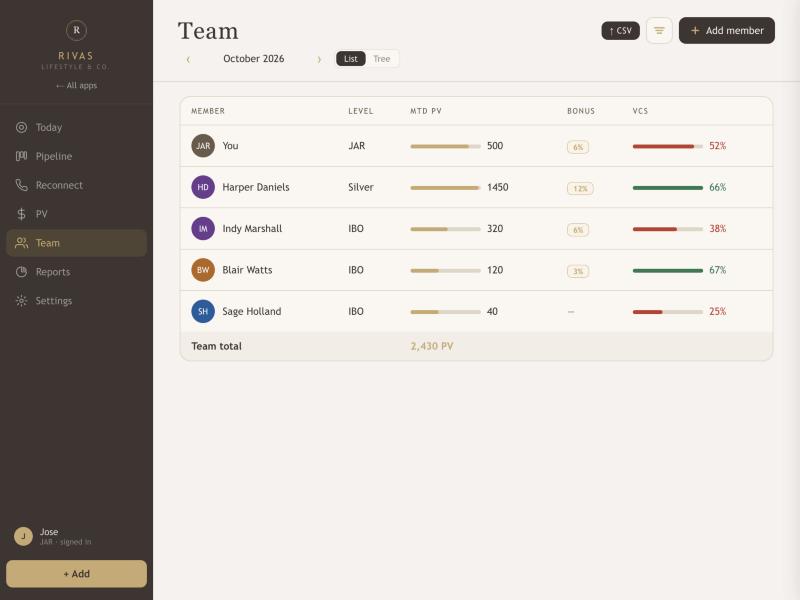
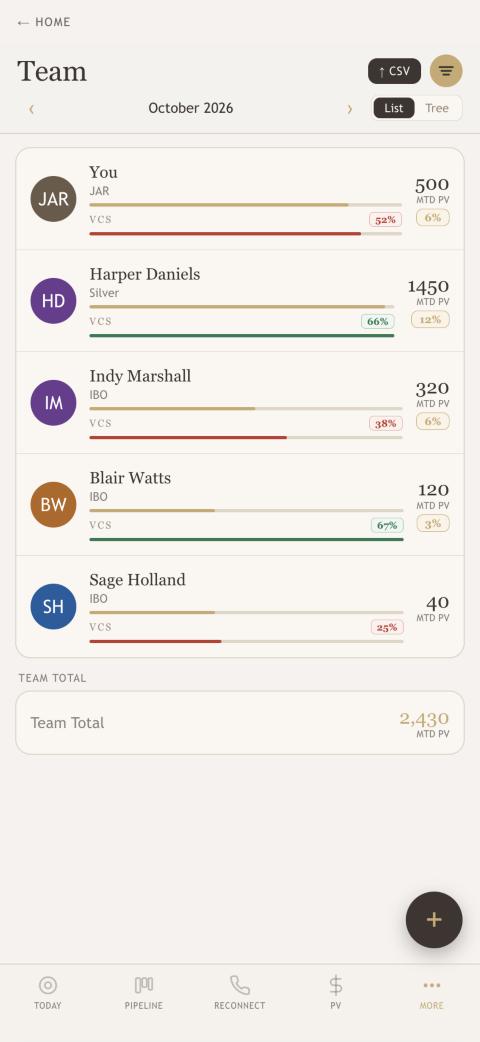
Team shows everyone you work with, plus a row for you, and how each person is doing this month.
 1
2
3
4
5
6
7
1
2
3
4
5
6
7
- Month buttons. View a past month.
- List / Tree. The List is the table. The Tree shows who sponsored whom.
- ↑ CSV. Import a team PV file to update everyone at once. The app shows what it found, who is new and what will change before you confirm.
- Add member and the filter button next to it. Filter and sort by bonus level, VCS, status and more. A small gold dot shows when a filter is on.
- Bonus. The performance bonus their PV has earned (see section 11).
- VCS. The share of their PV that comes from customers. Green means 60% or more, red means below. The small bar shows how close they are.
- Team total. All the PV together, including yours.
A member's details
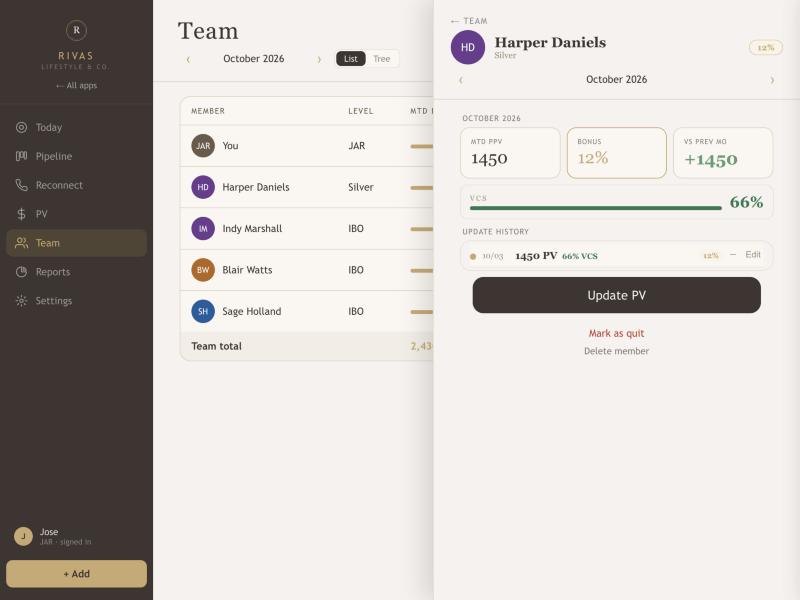
You'll see their PV for the month, their bonus level, how it compares to last month, their VCS bar and a history of every update. Update PV records a new number. Mark as quit moves them off your active team (with an optional note, and Restore member brings them back) and Delete member removes them entirely. The month buttons at the top step through earlier months.
09
Reports
Reports turn your daily activity into a weekly or monthly picture.
 1
2
3
4
5
6
7
1
2
3
4
5
6
7
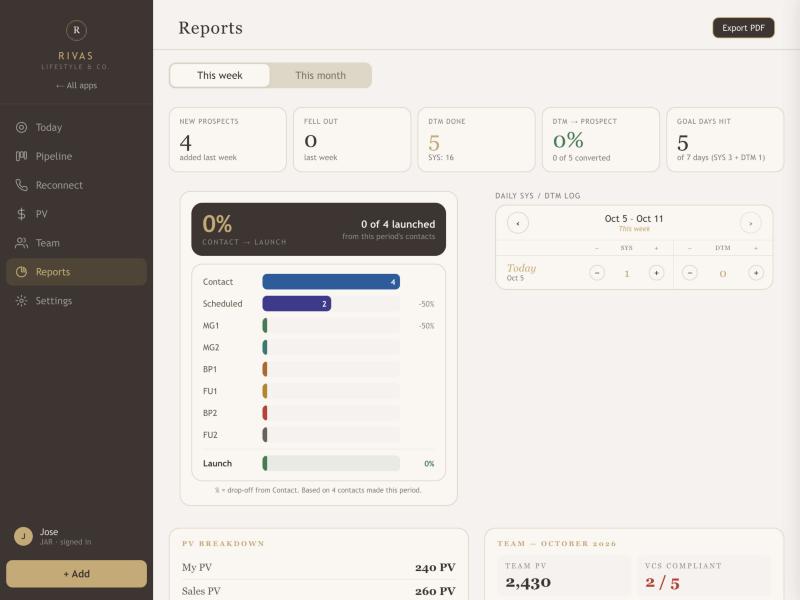
- This week / This month. This week shows the last full Monday-to-Sunday week. This month runs from the 1st to today.
- Metric tiles. New prospects, how many fell out, DTMs done, how many DTMs turned into prospects, and how many days you hit both goals.
- Funnel. Of the people you contacted in this period, how many reached each stage, with the drop-off between stages and the Contact-to-Launch percentage.
- Daily SYS / DTM log. Day by day counts. Use − and + to correct a day you forgot to log.
- PV breakdown. Your personal PV and sales PV for the month.
- Team summary. Team PV and how many members meet the 60% VCS target.
- Export PDF. A PDF copy of the report you can save or share.
On a phone, open Reports from More. The ‹ More button at the top takes you back.
10
Settings and backups
 1
2
3
1
2
3
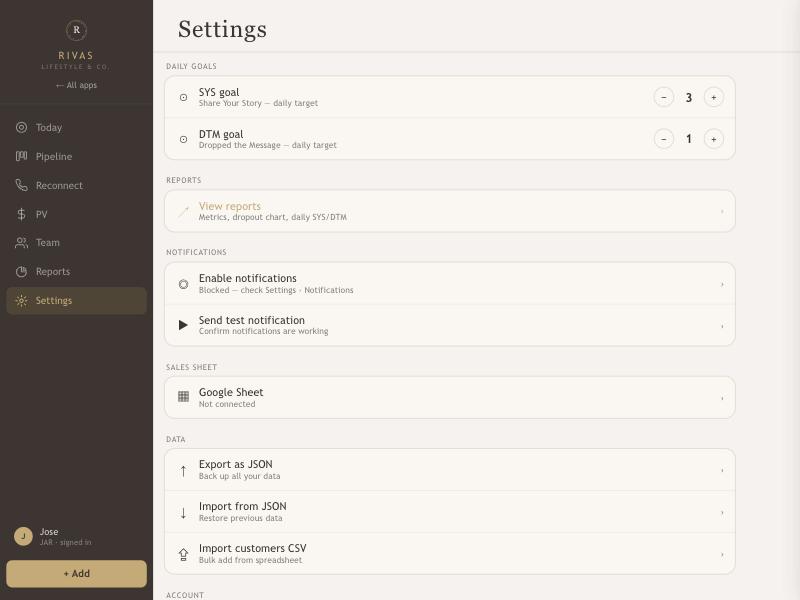
- Daily goals. Set your own SYS and DTM targets with − and +. Jose's and Jeanette's goals are separate, and changing yours doesn't change the other person's.
- Google Sheet. Connects your sales to a Google Sheet. Full steps are just below.
- Data. Export as JSON saves a backup file of everything and shows when you last did it on this device (amber after 30 days). Import from JSON restores one. Import customers CSV adds many customers from a spreadsheet.
When a save doesn't go through
Changes save to the cloud a moment after you make them. If something gets in the way, a bar appears above the buttons at the bottom of the screen.
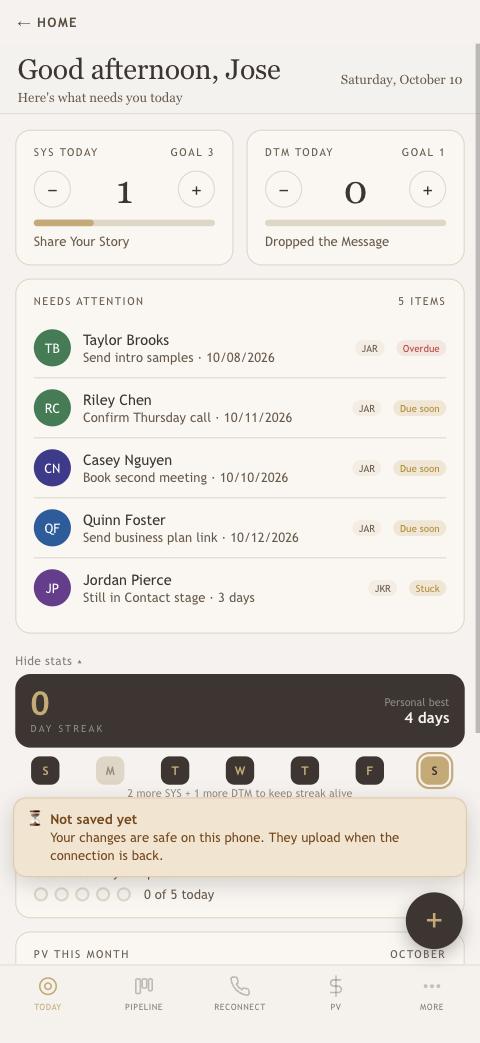
- Not saved yet (amber). The connection is slow or gone. Your changes are safe on this phone and upload when it's back.
- Couldn't save to the cloud (red). Tap Retry. If it asks you to sign out and back in, do that from the home page.
- All saved (green). Shows briefly after a problem clears.
While a save is waiting, changes from the other person are held back so they can't overwrite yours. They appear after yours is saved.
Send your sales to a Google Sheet
Once connected, every sale you log adds a row to a Google Sheet on its own. If you delete a sale in the app, its row is deleted from the Sheet too. You can also send past sales whenever you like by picking a date. Each row has the sale's date, customer, product, PV, revenue, how they paid, and who logged it.
You set this up once, using a short script that lives inside your Sheet. It takes about five minutes and it's free. Either of you can do it, and it then works for both of you.
Part 1. Create the Sheet and add the script
- Go to sheets.new while signed in to the Google account you want the sales to live in. A blank Sheet opens. Name it something like Rivas Sales (click the title at the top left).
- In the Sheet's menu bar, click Extensions, then Apps Script. A new tab opens with a code editor. It already has a little code in it, such as
function myFunction() {}. - Click inside the code box, press ⌘ A (Select all), then Delete. The box should now be empty.
- Copy the script below, using the Copy the script button, and paste it into the empty box with ⌘ V.
- Make up your secret key. In the first line of the script, find
PASTE-YOUR-SECRET-KEY-HEREand replace those words with a long random password, keeping the quote marks on both sides. Use 25 characters or more with no spaces. Write the key down or copy it somewhere safe, because you'll type the same key into the app in Part 2. - Click the Save button (the floppy disk icon) or press ⌘ S. You can name the project Rivas Sales if it asks.
/**
 * Rivas Business Tracker: sales logger
 *
 * Receives sales from the Business Tracker app and keeps one row per sale on the "Sales" tab.
 *  - A new sale adds a row.
 *  - Sending the same sale again updates its row (so importing past sales twice never makes duplicates).
 *  - Deleting a sale in the app deletes its row here.
 *
 * Setup: change SECRET below, then Deploy > New deployment > Web app (Execute as: Me, Who has access: Anyone).
 */
const SECRET = 'PASTE-YOUR-SECRET-KEY-HERE';   // must match the key you type into the app
const SHEET_NAME = 'Sales';
const HEADERS = ['Sale ID', 'Date', 'Customer', 'Product', 'PV', 'Revenue', 'How they paid', 'Logged by'];

function doGet() {
  return reply({ ok: true, message: 'The Rivas sales sheet is running.' });
}

function doPost(e) {
  let lock;
  try {
    const req = JSON.parse(e.postData.contents);
    if (req.key !== SECRET) return reply({ ok: false, error: 'Wrong key' });
    if (req.action === 'ping') return reply({ ok: true });

    lock = LockService.getScriptLock();
    lock.waitLock(20000);
    const sheet = getSheet();

    if (req.action === 'upsert') {
      const rows = rowMap(sheet);
      const fresh = [];
      (req.sales || []).forEach(function (s) {
        const values = toRow(s);
        const at = rows[s.id];
        if (at) sheet.getRange(at, 1, 1, HEADERS.length).setValues([values]);
        else fresh.push(values);
      });
      if (fresh.length) {
        sheet.getRange(sheet.getLastRow() + 1, 1, fresh.length, HEADERS.length).setValues(fresh);
      }
      return reply({ ok: true, added: fresh.length, updated: (req.sales || []).length - fresh.length });
    }

    if (req.action === 'delete') {
      const at = rowMap(sheet)[req.id];
      if (at) sheet.deleteRow(at);
      return reply({ ok: true, deleted: at ? 1 : 0 });
    }

    return reply({ ok: false, error: 'Unknown action' });
  } catch (err) {
    return reply({ ok: false, error: String(err) });
  } finally {
    if (lock) lock.releaseLock();
  }
}

function getSheet() {
  const book = SpreadsheetApp.getActiveSpreadsheet();
  let sheet = book.getSheetByName(SHEET_NAME);
  if (!sheet) sheet = book.insertSheet(SHEET_NAME);
  if (sheet.getLastRow() === 0) {
    sheet.getRange(1, 1, 1, HEADERS.length).setValues([HEADERS]).setFontWeight('bold');
    sheet.setFrozenRows(1);
    sheet.getRange('A:A').setNumberFormat('@');          // keep sale IDs as text
    sheet.getRange('F:F').setNumberFormat('$#,##0.00');
  }
  return sheet;
}

// { saleId: rowNumber }
function rowMap(sheet) {
  const last = sheet.getLastRow();
  const map = {};
  if (last < 2) return map;
  sheet.getRange(2, 1, last - 1, 1).getValues().forEach(function (r, i) {
    if (r[0] !== '') map[String(r[0])] = i + 2;
  });
  return map;
}

function toRow(s) {
  return [String(s.id), s.date || '', s.name || '', s.product || '', Number(s.pv) || 0, Number(s.rev) || 0, s.method || '', s.by || ''];
}

function reply(obj) {
  return ContentService.createTextOutput(JSON.stringify(obj)).setMimeType(ContentService.MimeType.JSON);
}
Part 2. Publish it and connect the app
- In the Apps Script tab, click the blue Deploy button at the top right, then New deployment.
- In the box that opens, click the small gear icon next to Select type and choose Web app.
- Fill in the settings exactly like this:
- Description: Rivas Sales (anything is fine)
- Execute as: Me (your email address)
- Who has access: Anyone
- Click Deploy.
- Google asks you to Authorize access. Click it, choose your Google account, and if you see Google hasn't verified this app, click Advanced, then Go to Rivas Sales (unsafe), then Allow. This is normal for scripts you write yourself. It's asking for permission to edit this one Sheet.
- You now see Web app with a long URL that starts with
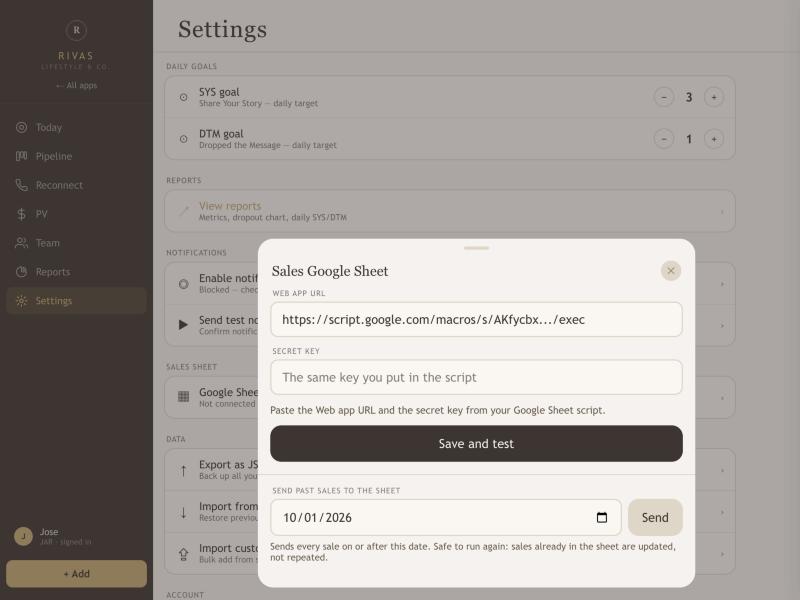
https://script.google.com/macros/s/and ends with/exec. Click Copy next to it. - Open the Business Tracker, go to Settings, and tap Google Sheet under Sales sheet.
- Paste the URL into Web app URL and type your secret key into Secret key exactly as it is in the script.
- Tap Save and test. You should see Connected. New sales now go to your sheet. If you don't, see the fixes below.
Part 3. Try it
- On the PV page, log a test sale with Log PV or sale.
- Switch to your Google Sheet. A tab called Sales appears with a header row and your sale in the next row. It can take a few seconds.
- Delete the test sale in the app with the red ✕. Its row disappears from the Sheet.
Send past sales
Open Settings, then Google Sheet. Under Send past sales to the sheet, pick a date and tap Send. Every sale on or after that date goes to the Sheet. You can do this any time, as often as you like. A sale that's already in the Sheet is updated instead of added again, so you won't get duplicates.
Good to know
- If the connection drops, the app keeps the changes and sends them when it can. Settings, Google Sheet shows how many are waiting, and Send waiting changes now tries again.
- Edits to the Sheet stay in the Sheet. The app only adds, updates and deletes sale rows, so don't edit the first column (Sale ID), which is how it finds each row. You can add your own columns to the right, sort, or build charts.
- Sales you delete in the Sheet by hand are not removed from the app.
- To turn it off, tap Disconnect the sheet. Rows already in the Sheet stay.
It says the secret key does not match
The key in the app has to be exactly the same as the one in the first line of the script, with no extra spaces. If you changed the key in the script after publishing, see the next item.
I changed the script, but nothing changed
A published script only updates when you publish a new version. In Apps Script click Deploy, then Manage deployments, click the pencil icon, set Version to New version, and click Deploy. The URL stays the same.
It says it could not connect or the sheet did not answer
Check that the URL ends in /exec and was copied from the Web app box, and that Who has access is set to Anyone. If you published it with a different setting, use Manage deployments to edit it, choose New version, and deploy again.
Nothing shows up in the Sheet
Make sure you're looking at the Sheet you opened Apps Script from, and open the tab called Sales. In the app, check Settings, Google Sheet for a message about changes waiting.
Notifications
Enable notifications lets the app remind you about follow-ups and reminders. Use Send test notification to make sure it's working. On an iPhone, notifications only work once the app has been added to the Home Screen. If it says Blocked, allow notifications for the app in your phone's Settings.
Your data is saved to the cloud every time you change something, and kept on the device for when you're offline. A JSON export is still a good safety net before any big change, like importing a file.
Back to home returns to the Rivas home page, and the version number is at the very bottom.
11
How the numbers work
Performance bonus
The bonus level comes from the PV for the month. Reach a level and you earn that percentage.
| PV in the month | Bonus |
|---|---|
| 100 | 3% |
| 300 | 6% |
| 600 | 9% |
| 1,000 | 12% |
| 1,500 | 15% |
| 2,500 | 18% |
| 4,000 | 21% |
| 6,000 | 23% |
| 7,500 | 25% |
Under 100 PV there's no bonus yet. The progress bars on Today and Team show how close someone is to the next level.
VCS (customer share)
VCS is the part of your PV that comes from customers instead of your own orders. At 60% or higher it shows green. Below that it shows red. For team members, the app uses the VCS figure from their latest PV update.
The streak
A day counts toward your streak when you reach both your SYS and DTM goals. The streak is the number of days in a row that count, counting back from today, so it shows 0 until you've hit both goals for the day. The note under the week row tells you what's left. Your personal best remembers your longest run ever.
Two people, one app
Each of you has your own daily goals, your own counts, and your own Reconnect list. Prospects and customers are shared, and each prospect is tagged JAR or JKR so you can filter to just yours.
12
Troubleshooting
The app looks old or is missing something new
Do a hard refresh: ⌘ Shift R in Safari on a computer, or swipe the app away and reopen it on your phone. Then check the version at the bottom of Settings.
A bar says "Not saved yet" or "Couldn't save to the cloud"
Your changes are safe on the phone. Check your connection, wait a moment, or tap Retry. See Settings and backups. If it keeps failing after you sign out and back in, tell Jose.
I changed something and it didn't show on the other device
Changes save a moment after you stop typing. Make sure you have an internet connection, wait a few seconds, and refresh the other device.
I can't drag cards on the Board
Dragging is a computer feature. On a phone, open the prospect and tap the stage you want instead. On a computer, press and hold on the card, not on a tag or name text you've selected.
The Board button isn't there
The Board and List choice only appears on a computer-size screen, and only when Prospects is selected. On a phone you always see the List.
A prospect disappeared from my list
Check three places: the Snoozed button at the bottom of the list (or the Snoozed column on the Board), the Fell Out chip, and the Launch chip. Fell Out and Launch are hidden from All on purpose.
Today says nothing needs me, but I know someone is due
Today only lists prospects that have a next action, a reminder, or a snooze date. Open the prospect and make sure the Next action has a date and that you tapped Save.
I need to undo something
Stage moves can be undone by moving the prospect back. For anything bigger, Import from JSON in Settings restores a backup you exported earlier.